Managed Software Delivery
General Configuration
Software Resource Settings
Advanced Options
Managed Software Delivery
Managed Software Delivery Policies are the intelligent way to deploy and manage software. These policies are versatile, and enable you to make use of the functionality discussed in configuration terms about the Software Components. Unlike Quick Delivery Tasks, Managed Software Delivery policies are Agent-based. The policies and executions are tracked on the Agent side.
General Configuration
Setting up a basic Managed Delivery policy is easy. Most of the configuration is done on the front end when you create the Software Resource. The following walkthrough takes you through the basic setup of a Managed Software Delivery (MSD) Policy.
- In the Symantec Management Console browse under the Manage menu and click Policies.
- In the upper left-hand pane browse down through Software > and select Managed Software Delivery.
- Right-click on the Managed Software Delivery folder and choose New > Managed Software Delivery.
- Name the Policy. As the name is not initially selected it is easy to fail to name it, which may result in confusion as the default name New Managed Software Delivery. Click on the name field to activate it.
- If desired, add a description by clicking on Add description found below the Name field.
- Under the section Policy Rules/Actions, under the Software tab, click the + Add button and select a Software resource.
- In the picker use the Search field to find the applicable or desired Software Resource and click OK. See this screenshot for an example of an added Software Resource:

- In the right-pane you can select what Package and Command line the Policy will use. Be sure to select the correct command line. If an uninstall command-line is selected inadvertently, this policy will not behave as expected.
 Note that the above example shows "A detection rule is not defined for the software." This does not mean the Policy will not run any Detection Rule, in fact it will run one. The default detection rule uses the Softwarecache.xml where the Software Discovery data is held. When software is installed, an entry is put into this cache to be reported the next time Inventory runs. If no detection rule is defined it will look for the software using this information in the cache file
- Scroll down and open the Applied to section by clicking on the expand/shrink arrow button.
- Click Apply to v dropdown and choose Computers.
- The Filter interface should be familiar if you walked through the Quick Delivery section concerning creating a Target. Add machines using the same method described on page 32.
- You should now see a row for the Computer List you just created, including a Count column that shows you how many machines are targeted for the Policy.
- Scroll down and open the Schedule section by clicking the arrow button.
- Starting with 7.0 MR4 and 7.1, there are two schedules that can be applied to a Managed Software Delivery Policy. The first schedule is the Compliance check, the second the remediation.
A common request involves having target clients download the package in advance, or even well in advance, of the execution. The download is tied directly to the compliancy check (running of the detection rule). Set the Compliance check well in advance to allow systems time to download the package. This is useful for large packages or servicing WAN sites.
- Under the Compliance section click the Add schedule v Dropdown and select an appropriate Schedule option. The different settings here will be covered later.
- 16. Under the Remediation section, either leave the default set to immediately or set a schedule later than the compliance schedule. Here is a screenshot showing the two schedule options:

- After adding the schedules, browse back to the top and be sure to turn the Policy on by clicking on the On/Off toggle dropdown and selecting On.
- Click Save changes to save and commit the policy.
How do I get the ASAP option to run a Compliance check immediately? This is a common question, especially from those customers who were familiar with the ASAP option found in version 6.x of Software Delivery. In the above screenshot, you'll notice there is a reoccurring schedule and a run once schedule with no repeat. ASAP is achieved by having a Run Once > No repeat schedule where the Start date is in the past. If you want ASAP to work right out of the gate, click Advanced and change the start date to the day prior.
Software Resource Settings
After you've added a Software Resource to a Managed Software Delivery Policy, you have a myriad of options in how the policy interacts with the Software Resource during detection and deployment. This section covers all the settings involved. When selecting a Software Resource in the Rules/Actions list, the right-hand pane presents the settings surrounding the Resource.
Compliance settings
By default the Compliance Settings will automatically choose what Detection Rule was selected during the creation of the Software Resource. You can toggle the detection on or off by checking or removing the check to the box labeled: Perform software compliance check using:. You can also manipulate the detection rule by clicking on the hyper link named after the Detection Rule name. You will see the View Rule dialog, which allows you to edit the Expressions and rules defined.
WARNING: Changing a Detection Rule in this window will result in the Software Resource being updated with the changes. Only make changes that you wish to make to the Software Resource directly. Also note the default detection rule explained under the Managed Delivery Policy walkthrough preceding this section.
Remediation settings
By default the Install Command-line is selected in the Command-line dropdown. If the Resource has more than one command-line, use the selection dropdown to choose the appropriate one. Below the dropdown the Command-line is listed for reference so you can ensure you've selected the right one. The Package dropdown allows you to select a different Package if the Software Resource has more than one Package defined. For most use cases typically only one package is required or specified.
Supersede settings
The two checkboxes listed here allow greater control of how updates and newer versions are handled in regards to the Policy. The logic to allow automatic updates or to avoid applying a lower version than what's already installed avoids any issues stemming from the wrong versions being applied.
- Automatically upgrade software that has been superseded by this software - Any software detected that this software supersedes will initiate the update.
- Do not install if a newer version of this software is already installed - This uses any Software Resources marked as superseding the selected Resource.
Note that the options will be grayed out if no Supersede associations are found for the selected Software Resource.
Advanced options
At the bottom of the Remediation settings section Advanced options are offered. While these are similar to those Advanced Options covered earlier for Quick Delivery Tasks, there are key differences. This section covers the different options and how they affect the Policy. First I'll details the options, and then provide a walk-through for some of the more popular options.
Download Options
By default the Altiris Agent will download files to the following location: install_path\Program Files\Altiris\Altiris Agent\Agents\SoftwareManagement\Software Delivery\. Each package is placed inside a folder matching the GUID of the Package and a subsequent Cache folder. At times an administrator may want to put the package in a non-default location. Change the Destination download location radial to Location on destination computer. The path will be local relative to the target systems.
The Download using: options present a unique situation. In versions 6.x the defaults found here were also found under the Altiris Agent Configuration Policies. This is no longer the case. The settings for Downloading in the Altiris Agent Configurations and the options here are exclusive. While it does add to confusion, it allows you to configure more options than previously. There are two primary use cases for manipulating the options here:
- Control limited bandwidth between the Package source and target clients, particularly in WAN environments or poor VPN connections.
- Have the execution occur locally directly from the Package Server instead of downloading it first.
 The two checkboxes can be checked, giving the appearance that the two settings can be used together. Since they are mutually exclusive concerning downloading or running remotely, you should only use one at a time.
The option: Delete package from client computer can be used to control how long the source files are available. For most Managed Software Delivery Policies the default is 7 days. You may need to increase this, or deselect the option altogether when considering how long the source files should stay for the circumstance.
The nature of installations may suggest you'll only need the files for the Installation. Check the option to delete the package to clean these up, especially if hard drive space is at a premium. One type of exception is for those applications that install via an MSI and where the Source files may be needed in the future for a Repair, Component addition, etc.
Run
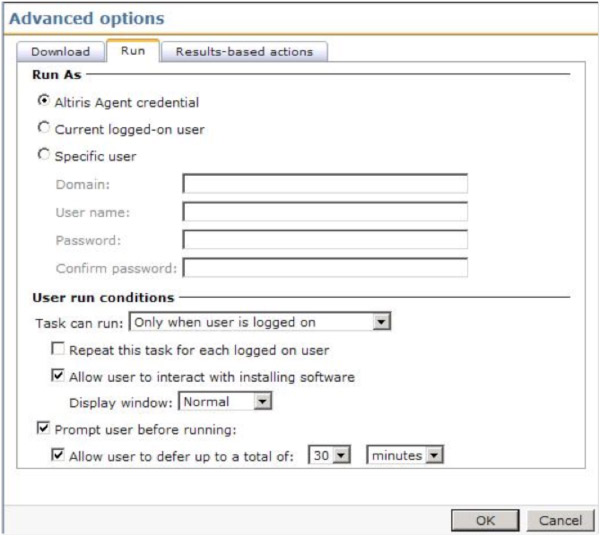
The Run As options provides options for what user context will be used for the installation.
The default option on a Managed Software Delivery Policy was changed to be the Symantec Management Agent credentials. The policy will use the Agent credentials to elevate the execution from a logged on user that will allow this configuration to work even for users that do not have install rights. Note that we execute in a separate session so any rights elevation will not be usable by the logged on user. We have seen occasional rights issue despite the elevation, so unless there is a reason to target the logged on user, it is advised to only use this when the installation requires the user's own session.
Generally the Symantec Management Agent credentials are sufficient for an install. Since the package is downloaded, all necessary rights exist on the local system. Some exceptions to this are detailed here:
- The install accesses network resources or location during the install. This does not include the ability of the application to contact network resources after the installation.
- The source files for the install will be executed from a remote location, such as a UNC or the option to execute from the Package Server is selected.
- The application must be run under the User's context that will launch the application for use.
For the first two use-cases, Specific user should be used, one that has rights to the resources or network locations to be used during the execution. For the last one the execution must be set to Current logged-on user.
For applications that only work when installed under the user's own context, use the configuration Current user credentials and it will elevate the install session for that user to allow the install to proceed. Occasionally we've seen issues with this, so test before deployment.
User run conditions allow greater control over how and when the policy executes. The following options are available:
- Task can run: - This option allows an administrator to control in what state the system is in for execution regarding user log on. Scenarios include:
- Only when user is logged on - This is the only option if you selected Current logged-on user under the Run As section, though if you selected another Run As you can still specify this to ensure someone is logged on when the execution occurs. This is important if your installation requires some sort of user interaction when it executes.
- Whether or not the user is logged on - This option is used to allow the install no matter what user state the system is running under. This one will allow the policy to execute the soonest.
- Only when no user is logged on - This allows an administrator to restrict resource intensive installs to run when no user is actively using the system.
Option C can cause difficulties depending on how users manage the power state of their computers. For example if they log on quick enough after booting up the computer the execution may miss the small window of opportunity. Also if users don't typically log out, but shut down their systems at the end of the day, this can also delay the remediation.
- Repeat this task for each logged on user - if the installation you are running requires to run under the user's profile to apply correctly, this option is very useful to ensure it runs for every user who uses the system.
- Allow user to interact with installation software - To put it simply, this pipes the execution to the User's desktop, running in interactive mode. You can also select how the execution shows, from the following list:
- Normal
- Hidden
- Maximized
- Minimized
- Prompt user before running - This setting allows the user to defer the execution. This helps mitigate any work the user is conducting when the installation begins to happen. Users can save their work before the installation to avoid any potential data loss.
This screenshot shows a typical configuration of this tab:
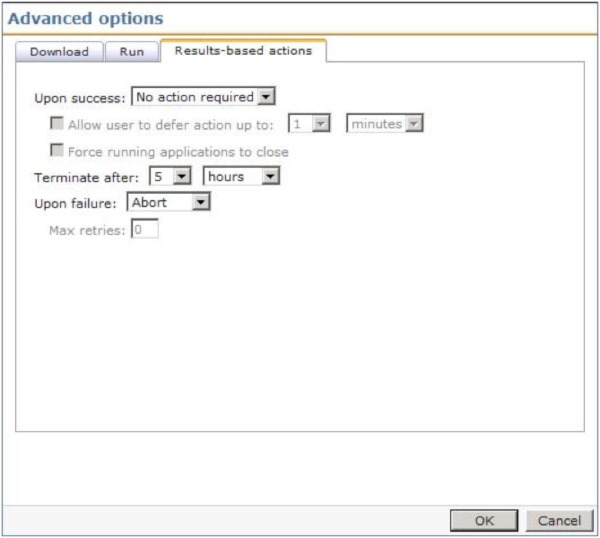
Results-based actions
Outside of the actual execution of the Software Resource, these settings allow how the Symantec Management Agent and Plug-ins interact with the task.
- Upon success: This allows the Task to execute a Log off or reboot of the system after a successful completion.
It is highly recommended to allow the Symantec Management Agent to initiate a reboot. This allows the Agent to properly handle all Agent processes so nothing is lost on the reboot. For example the progress of the Managed Software Delivery may be lost if the installer executes the reboot (stored in the file AeXSWDPolicy.xml). In the command-line suppress the reboot and select the Upon success option to initiated the reboot.
- Allow user to defer action up to: Use this option to allow the user to save and make any other preparations for the reboot. This is highly recommended when configuring a reboot to minimize user disruption.
- Force running applications to close - If an open application prevents the shutdown, this option will forcibly end the application to conduct the reboot. Use with caution.
- Terminate after: This option is a fail-safe to prevent hung or sluggish installs from locking up the Altiris Agent Policy queue. Generally putting in a value that is safely beyond the expected execution time, but not too long to paralyze the Agent, should be used.
- Upon failure: The following selections are available:
- Abort - This will stop the MSD from continuing. If you've configured more than one resource or task in the MSD, any subsequent items will not be run.
- Continue - this will instruct the MSD to continue on to subsequent items in the MSD.
- Restart - This will retry the remediation execution. Max retries should be set to an appropriate number.
Walkthrough
The following process uses common settings to configure the Advanced options of a Managed Software Delivery Policy.
- Select the Managed Software Delivery Policy to configure, or if you are still in the creation process, click the Advanced options button under the selected Software Resource.
- Under the Download Options tab, under the Delete package from client computer settings, check the box labeled: If unused for:.
- From the drop down select an appropriate length of time. For this example I set 7 days.
This setting only comes into effect when the Managed Software Delivery Policy no longer applies to the targeted system. This means under normal circumstances the package will not be deleted. If you use a dynamic filter, or you disable the policy, then the setting will apply to the Package.
- Click the Run tab.
- Change the option to Symantec Management Agent credentials.
- Leave the option checked: Allow user interaction. Since you can suppress visually the execution via the command line or by the setting of how it starts (choosing hidden), this option can remain checked. In few occasions we've found user-based installs to work using this option checked.
- Check the option Prompt user before running.
- Check the option Allow user to defer up to a total of.
- Input an appropriate length of time, such as 30 minutes or 1 hour.
- Click the Results-based actions tab.
- Change the Terminate after: setting to 5 hours (in 7.1 this is the default).
- Change the option Upon Failure to Abort. See this screenshot for an example:
- Click OK to save the changes.
- If newly creating a Managed Policy, Click OK to create it. If editing an existing Managed Policy, click Save changes to apply the new settings.
Return to Part 3
Coming Soon: Part 5