The article is considered important for anyone wanting to leverage Software Management in the Symantec Management Platform (Notification Server) environment. Learn the tips and tricks for using Software Management successfully. Warnings, recommendations, explanations, and best practices are covered.
Contents
Introduction
General Configuration
Software Library
Software Management Plug-Ins
Licensing
Software Catalog
Process Flows
Software Resource
Package
Command-Line
Rules
Associations
File Inventory
Software Publishing
Quick Delivery
Advanced Configuration
Targeting And Scheduling
Task Server
Managed Software Delivery
General Configuration
Software Resource Settings
Advanced Options
Task Settings
Sequencing
Rules
Manual Execution
Software Publishing
The Software Portal
Introduction To The Portal
Configuring The Software Portal
Administrator Portal
Publishing To The Portal
Software Publishing Security
Tracking Deployments
Task Server Statuses
Provided Reports
Conclusion
Legend
 - Warning - These tips provide you warnings for known configuration issues and other items that may be important to know.
 - Best Practices - From experience the Best Practices tips provides you methodology or considerations when using the applicable features.
Introduction
Software Management in Notification Server 7.0 underwent the largest transformation of any of the products available from the 6.0 architecture. New functionality provided expanded abilities and provided some real ROI for the whole of Software Management. From new Detection capabilities to intelligent monitoring of Software, Software Management offers a large toolbox for not just deploying software, but for managing software.
Due to this influx of new functionality, the first release required a steep learning curve, and as customers starting using Software Management the idiosyncrasies and problems began to surface. Many of these have been addressed, but as there are many configuration points, the potential for a problematic configuration remains. This document attempts to address these points, providing warnings to avoid the potential pitfalls, and provide configuration details for successful Software Management.
Best Practices are offered based off understanding of typical goals. In other words these are offered as they fit the majority of use cases. It is possible an environment will not cater to these Best Practices. As such the functionality behind the configuration options is explained, where possible, to help you make your own informed decision on how it should be configured for your environment. This document is provided "As Is" and implies no warranties, guarantees, or supportability.
As Software Management is updated through Service Packs, Point Fixes, Hot Fixes, or Point Releases, this document will be updated if possible to include any changes presented by updates.
General Configuration
For effective use of Software Management, it's important to set all the general settings as needed for your environment. Though some of these settings won't be known until later, I'll cover all general settings for reference.
Software Library
The Software Library is a location where all Packages are stored (when Software Library is selected as the Package Source). The Software Library has two requirements before it can be used successfully. One is a one-time only setting, and the other is required on any system that needs to run the Console in conjunction with the Software Library.
- Software Library Location - This should be a location that has a lot of storage, or at least sufficient storage for all packages to be managed within the infrastructure. To set the location, follow these steps:
- At the desired location where you wish to store the packages within the Software Library create a base folder. When packages are added they will be added to this folder as subfolders.
- In the Symantec Management Console, browse under Settings > All Settings > Software > Software Catalog and Software Library Settings > Software Library location, as shown below:
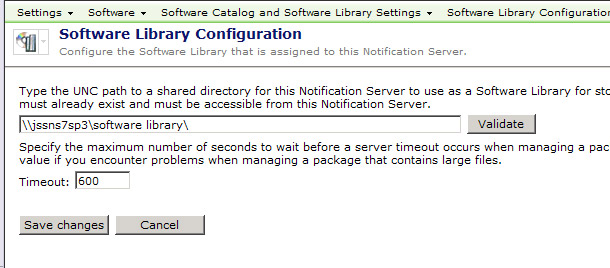
- Set the location as a UNC path to the desired location.
- Click Validate to ensure the path is set correctly. Reasons it may fail are:
- i. The Altiris Application ID, or the Account associated with NS, may not have rights to the UNC specified
- ii. The UNC is not a valid share
- iii. The UNC cannot be reached (DNS or other related network issues)
- Click Save changes to commit the settings once validated.
Note the timeout value set here. While the default will be 600 starting in SP4, the default previously was 300, which is not always sufficient to allow a large package, whether with large files or many files, to successfully import to the Software Library. Set this to 600 if it is not already.
If your Software Library resides on the same disk as a Package Source, the files will be duplicated into the Software Library share, taking twice the necessary disk space. If the package is local to the Software Library, you can use UNC as the source instead of the Software Library, or mount the package in another location to use as a source.
- Java Runtime Environment - To use the Software Library option when configuring a Package, Java Runtime Environment (JRE) is required. You can go to www.java.com to obtain the free download of JRE.
NOTE: the JRE needs to be installed and available on any system that runs the Symantec Management Console where Package creation is to be used.
Software Management Plug-ins
There are two Plug-ins for Software Management. The first one is automatically installed as part of the Altiris Agent. This one is called the Software Management Framework Plug-in. This allows all Solutions and the NS itself to make use of the Software deployment and management capabilities for the distribution of packages, policies, and certain task types. To extend the functionality for use within the Software Management Solution, the Software Management Solution Plug-in needs to be installed. There is also one other "Agent" that needs attention. It is not an actual plug-in, but configures local systems for use with the Software Portal.
When setting up the policy to roll out the Software Management Solution Plug-in, it's important to note that it is advisable to configure it for the Software Portal at the same time. This simplifies the process so target systems are ready for Portal use with the rollout of the Plug-in. If you do not wish to rollout the Portal with this Plug-in, simply enable the Install Policy as is for the Plug-in.
The following procedure walks through configuring and pushing out the Software Management Solution Plug-in with the Software Portal Enabled:
- In the Symantec Management Console, go to Settings > All Settings > Software > Software Portal Settings > and select Software Portal Settings.
- Set the maximum number of Open requests in the right-pane to a reasonable number of your environment.
- If desired, change the Company Name and Logo to brand the Software Portal to your Company.
- Click Save changes when set correctly.
- In the Symantec Management Console, go to Manage > All Resources > All Resources > and select Software Command Line.
- In the search box, type: Software Portal
- Double-click on the entry labeled: Install with Software Portal - No UI
- In the left-hand pane of Resource Manager, click Edit Command Line.
- In the resulting window, the command line can be edited. The default is a. A possible configuration is b. You can toggle TRUE to FALSE to disable an item. For example b. does not have a Software Portal link on the Desktop and does not show the portal in Add/Remove Programs. Also reference the attached screenshot:
- msiexec /I "Software Management Solution Agent_7_0_rev1.msi" ALLUSERS=1 INSTALLPORTAL=1 PORTALSTARTMENU=TRUE PORTALDESKTOPMENU=TRUE PORTALADDREMOVE=TRUE PORTALAGENTMENU=TRUE /qn
- msiexec /I "Software Management Solution Agent_7_0_rev1.msi" ALLUSERS=1 INSTALLPORTAL=1 PORTALSTARTMENU=TRUE PORTALDESKTOPMENU=FALSE PORTALADDREMOVE=FALSE PORTALAGENTMENU=TRUE /qn

- Edit the command-line as desired for your environment.
- Click OK to save the changes.
- In the Symantec Management Console, go to Settings > Agents and Plug-ins > All Agents and Plug-ins > Software > Software Management > Windows > and select Software Management Solution Agent for Windows - Install.
- In the Program name dropdown, select Install with Software Portal - No UI. See this screenshot for a sample:
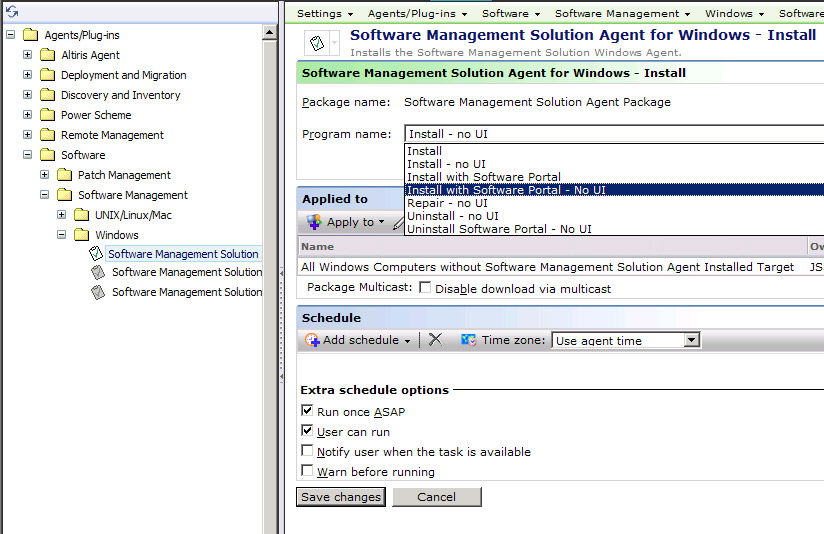
- Click Save changes to apply the new command-line.
- Normally the default filter suffices, but this can be changed at this time if required, as well as the schedule.
- Enable the Policy.
- Done! The Agent will now be deployed as the target computers check in for a new Configuration. As this is policy based it may take a number of hours for all machines to run the policy and install the Plug-in.
Licensing
Protection against unauthorized use is required for any Software Company. Licensing ensures that only authorized organizations (AKA those who have purchased) can use the software, and that they only use it within the scope of their license. While required in some form or another, it is not desired that licensing get in the way of successfully using the software. For the Software Management Framework, no license is required. For the Software Management Solution, a valid license must be installed in order to use it.
Software Management Solution counts licenses by the number of computers that have the Software Management Solution Plug-in installed. The count is figured off of the table Inv_AeX_AC_Client_Agent which Basic Inventory populates. The count is based off of the Agent Name: Software Management Solution Agent and the corresponding Agent Count column.
Keep a tab on how many computers have the Software Management Solution Agent installed. Visit SIM in the Licensing section, and ensure you don't roll the agent out to too many systems. If you need more licenses ensure you receive them and install them before you roll additional Plug-ins out.
If your Software Management Solution license has been exceeded, the following action can be taken to free up licenses.
- In the Symantec Management Console, go to Manage > Filters > Software Filters > Agent and Plug-in Filters > and select All Windows Computers with Software Management Solution Agent Installed.
- Click Update membership to ensure the Filter is up to date.
- In the list of computers, find those computers you wish to remove a Software Management License from. Make a list of these computers
NOTE: If you wish to make a dynamic filter, then it is unnecessary to create a list.
- In the Symantec Management Console, go to Settings > All Settings > Agents/Plug-ins > All Agents/Plug-ins > Software > Software Management > Windows > Software Management Solution Agent for Windows - Uninstall.
- Under the Applied to section remove the default Filter by selecting it and clicking the red X delete button.
- Now add the filter of the systems you wish to remove the Plug-in from. If it is a dynamic filter you've created, great.
- If you wish to use the list you acquired in step 3, follow these steps:
- Click Apply to > Computers.
- Click Add Rule.
- Change Then to Exclude computers not in, and the next field to Computer List.
- Click the ellipses <...> at the end of the row to open the computer selection dialog.
- From the left-hand pane select the computers to remove the Plug-in from. Note that you can use the filter to find systems if you have a large list.
- Add your selects by clicking the > button (or if you have filtered down to the list you wish, use the >> button). See this screenshot for a sample:

- Click OK to apply the new filter.
- Enable the policy, aka turn the policy to the ON status.
- Click Save changes to save the application of the new filter.
- Done!
As the targeted computers update their configuration, they will receive the new uninstall policy and remove the Plug-in. It then requires those targets to send an updated Basic Inventory. To finalize the process, the License Refresh must occur. The entire process can take time to propagate to all targeted systems.
Software Catalog
There are a number of other settings/configurations that can be utilized by the Software Catalog. The following items are available and can be used as desired. For most general use they do not necessarily require configuration beyond the defaults. To locate these items, in the Symantec Management Console go to Settings > All Settings > Software > Software Catalog and Software Library Settings.
- Clean File Resources - This is an automatic process that reconciles data captured from multiple computers to synchronize file resources, if needed.
Best Practices!: The results of Software Discovery, called Add Remove Programs data or Installed Software, may show incomplete data after machines have reported Inventory. If this occurs, manually run the Clean File Resources task to correct the problem.
- Installation Error Code Descriptions - There is a large default list. Only if you wish to clarify specific errors or add your own should you use this feature. It can be nice is large environments where the IT professionals working on issues may benefit from more verbose error messages.
- Known As - This allows catalog information to be correlated from Company Name to a corresponding resource. This also allows multiple versions of a company's name to map to the same resource. For example:
- Microsoft > Microsoft
- Microsoft Inc. > Microsoft
- Microsoft Corp > Microsoft
- Microsoft Corporation > Microsoft
- *Microsoft* > Microsoft (allows a wild card to catch multiple exceptions)
- Software Discovery - Software Discovery is executed by the SMF Agent, but it is now wrapped into Inventory Solution. Please see the Inventory Solution section of this document.
Process Flows
The following Process Flows show how different mechanisms work with Software Management. These will be referenced in the subsequent sections as needed.
Software Resource
A Software Resource houses Package and command-line information, and contains a myriad of metadata for a specific piece of Software. This includes Package information, or the physical files, the command-lines that can be executed against the package, detection and applicability rules, file information, associations with other Software Resources, and Software Publishing information. The culmination of this data makes up a single Software Resource in the Notification Server infrastructure.
Software Resources are organized in the Symantec Management Console under Manage > Software > Software Catalog. The Catalog can contain thousands of entries that mostly make up metadata of a particular Software Resource. For Software that is actionable, or that can be delivered, look under the Deliverable Software section, which is divided into Releases, and Updates and Service Packs. Each view contains all of the applicable type of Software Resource, no matter how that Resource was created, replicated, or imported into the Notification Server.
- To create a Software Resource, Select one of the following Organizational Views:
- Deliverable Software
- i. Releases
- ii. Updates and Service Packs
- Click the Add button and choose the appropriate Software Resource type from the list:
- Software Release (most common)
- Service Pack
- Update
The general information, or Properties, for a Software Resource includes the following:
- Name - This is the label or name that this Software Resource will show up as in lists or pickers.
- Type: This will list what type of Software Resource it is from the above list.
- Version: This field does not have to be the actual Product Version of the Software Resource, so you can use your own number system.
One function of this version field is to check against changes made to the Resource. For example if the Version number changes, the components within the Resource are invalidated and must be refreshed. This means any changes you've made to the components of the Software Resource will go through the update process on the Notification Server and can expedite updates to the targeted clients.
- Company: Used to put the manufacturer of the Software contained within the Resource. This can assist with reporting purposes.
- Software Product: Used to correlate different versions of the same product, and again assists in reporting purposes.
- See the below screenshot for an example of the Properties.

Package
The Package within a Software Resource is a collection of physical files and folders (if you can really call a digital file "physical"). The most basic explanation is a Package is a folder and all files and subfolders/files therein. For all Package Source types except for Software Library, this is all a Package is. The Software Library option adds another layer to include the default execution file no matter where it is contained within the folder structure of the package.
The follow methods can be used as the Package Source. Please note that the Package Source does not necessarily indicate where a targeted client will obtain the Package from. It's where the Notification Server will provide the Package from.
- Access package from an existing UNC - The Notification Server will provide the UNC to any Package Server or Client that requests the Package. An HTTP link is also created off the UNC to be used to distribute the Package.
- Access package from a URL - This reacts the same way as UNC only flip-flopped.
- Access package from a directory on the Notification Server - The Notification Server will turn the designated folder into a UNC and URL share to provide to all Package Servers or Clients that request it.
- Software Library - The Notification Server will import the package when configured. This process does the following:
- The contents of the folder (files and subfolders/files) to the location specified in the Configuration of the Software Library covered earlier in General Configuration section.
- Each file will be scanned. All EXE and DLL files will be cataloged as part of the Software Resource.
- A hash will be generated for all EXE and DLL files.
- A default Installation File will be set. The below screenshot shows a sample of this. Note that the Installation File will be bolded. By default the import process will try to analyze the most likely file and automatically set it. It is advised to check and ensure the right file is selected. To manually set it, select the file and click the Set Installation File button.

The Package Import process can take a long time depending on the size of the package. While there are a lot of factors that contribute to this, including network speed between the NS and the Package Source and Resource availability on the Notification Server, I've seen large packages take up to 45 minutes to import. The specific IE session will be locked during this process, so open a new console if you need to continue working in the meantime. Also we have seen reports of the import process timing out. See this KB article for reference: https://kb.altiris.com/article.asp?article=49112&p=1
Click on the Package Server tab. The default configuration is set to All Package Servers with Manual Prestaging. Despite the name, this feature basically means the package will not be delivered to Package Servers until a client has a policy that needs it.
This recommendation comes with a caveat. If you have a large distributed environment, you may not want all your Package Servers to host every package until they are needed. If this is the case the default should be OK. Otherwise, follow these steps:
- Click on the Package Server tab after you have configured the Details tab of the Package.
- Under the dropdown labeled Assign package to, change the option to All Package Servers.
- There is a known issue that you cannot click OK from the Package Server tab if you've changed the assignment setting under the tab. See this KB for reference: https://kb.altiris.com/article.asp?article=48397&p=1. Click back on the Details tab before clicking OK to avoid the issue.
If you leave the selection on Package Servers with Manual Prestaging, there is a major defect to be aware of. The trigger for a Package Server to download the Package comes from a client that requests the Package after receiving it within a Policy. This does not include Tasks, so any Quick Delivery tasks that reference a Package that is not on a Package Server will not be able to download it, thus failing the Task. See this KB for more information: https://kb.altiris.com/article.asp?article=48485&p=1
Note you also have the option of specifying an alternate location for the Package Server to download the Package locally using the check box labeled: Package Destination on package servers (leave blank for default).
Command-line
Consider the Command Line as the action against a package. After a Task or Job has been delivered to a target, after applicability and detection rules have been executed, after the package has been downloaded, the execution occurs, as configured in the selected command-line. Obviously the command line is a string that executes against a particular file, but there are other aspects to the Command-line Object within Software Management to be mindful of.
The following walkthrough takes you through configuring the Command Line:
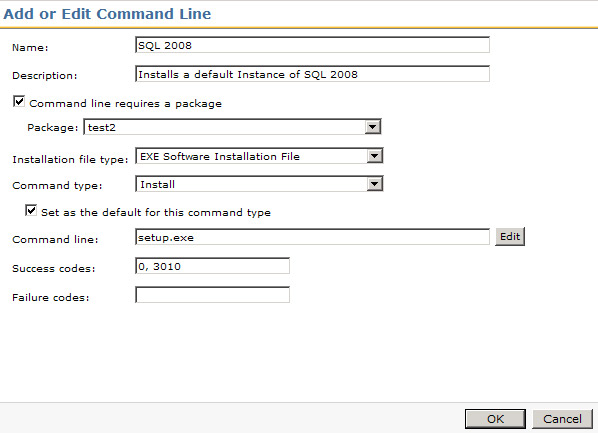
- Under the Package tab of the Software Resource click the Add command button.
- Provide a Name for the Command-line. If desired, provide a Description.
It starts to feel like there are a bazillion names within a Software Resource. This includes names for the Software Resource itself, Package(s), Command Line(s), Association Rule(s), Detection Rule(s), The Task(s) or Job(s) applied to it... after a while you may be tempted to put in generic names. This will make it difficult when managing the individual objects. Use a naming system you can easily use to recognize what an object is intended for.
- The option Command-line requires a package can be unchecked if you wish to run a command-line against an installer that already exists on the target computers. For this example we are leaving it checked.
- Set the Installation file type to the correct type. This will enable the Command-line builder for that type of Installer file.
- Depending on what the command-line is for set the Command type appropriately. See below for an explanation of the settings:
- Custom - This can be used for anything as a catch all for any execution that doesn't fit the other three options.
With a Custom type selected you cannot make it a default command-line for the Software Resource. If this is to be the only Command-line in the Package, it does not make a difference, but if you have multiple command-lines then a custom command-line will never be used for the Software Portal. If you wish a command-line to be used in the Software Portal you must set Install as the command-type.
- Install - Typically used when the command-line will install an application. This will also be the default for a Software Portal request.
- Repair - If the command-line initiates a repair of an application, such as a corrupted MSI installation, use this option.
- Uninstall - Used for uninstalling the Software Resource.
- Check the option 'Set as the default for this command type' if required. Note that this option is used when analyzing what to run via a Software Portal request.
- Enter the command-line including all applicable switches.
Best Practices!: Often when time is pressing an administrator will not test the command-line before rolling out Software into Production. It is recommended to always test the command line before adding it to the Software Resource. The following items should be considered when generating a command line:
- Can you successfully launch the installer using a command-prompt at a similar system to the ones being targeted?
- When is executes, does it prompt the user for anything? This is important if the installation will be hidden from the user. If it is hidden, and there is a prompt, the prompt will sit in limbo until the Task or Policy is killed.
- What rights are required to run this specific command-line? Make sure the job or task you use to roll this out is set with an account that can execute the command line successfully.
By testing, you can avoid rolling out badly configured Command-lines.
- The success codes should be configured to contain those installer return codes that you wish to equal success. A common return code considered successful is 3010, which means the installation was successful but a reboot is required.
If the field is left blank, the default success code is 0 only. As soon as you enter a return code into the field, 0 is no longer considered a success unless it is explicitly added to the field, as shown in the following Screenshot.
Please add 0 if you are adding other return codes to this field.
- Inherently all codes that are not success are considered failures. However if you add specific failure codes here, they can be used in Task Server Jobs as part of the conditions. For example you may want one failure code to result in one action, and a different failure code in a different action.
- Click OK to add the new command line.
- Click Save changes to save the new command-line to the Software Resources.
- Lastly, be aware of this issue details in this KB: https://kb.altiris.com/article.asp?article=49387&p=1
Please note that I have asked the Resource to be saved after each major item is created. This will help save your progress so if a problem occurs in IE or on the server you will have much of your work saved.
You can add any number of command lines you need to the Software Resource. Typically you can create both an Install and Uninstall command line, and, if available, a command line that repair the application.
Rules
To add intelligence to the Software Management Process, a myriad of Rules have been provided. Rules are used for two primary purposes:
- Detect whether or not a specific Software Resource is present on the target system.
- Check to see if the specific Software Resource is applicable or not for the target system.
- The two rules combined results in dynamic management of configured software applications. For example if I have an Application, one for one versions of windows and one for another, I can create one Managed Software Delivery Job that contains both the versions of the application. The detection rules would check to see if the Application is there, and the applicability rules would ensure the right operating system is in place. The result would be that the right version of the Application would be installed on the right version of Windows.
Both Detection and Applicability Rules use the same Rule types. The difference is that when a Detection Rule is marked True, the Software Resource is NOT applied. When an Applicability Rule is marked as True, the Software Resource IS applied. If you think of it in the paradigm I provided above you can see how you would use the two rule types together. It is not necessary to use both or even one of these rules, but it does add intelligence to the rollout. While all Rules can be either type, some cater better for one type. See below for explanations.
Here is a list of Rules and their known practical use:
- 64-bit Windows Installed - If you have an application, service pack, or update that is specific for 64 bit systems, instead of trying to figure it out on the front end by creating a filter that only contains 32-bit systems, simply use this rule as an Applicability Rule.
- File Version - This can ensure that an update only applies to systems with the right version of an application installed. Conversely it can be used to see if the specific Software is already installed or not.
- MSI Product Code - For MSIs this option can be used to detect the presence of the application associated with the MSI. Since the MSI Product Code will be different for different releases, you could use this to detect and apply upgrades.
- Multilinqual User Interface Installed - I have not used this one.
- Processor Type - There are three options available. These point to actual hardware, whereas the previous 64-bit Windows Installed rule is specific to the software. The three options are:
- x86
- Intel Itanium Processor Family (IPF)
- x64 (AMD and Intel)
- Registry Key Exists - I consider this a more general Rule to the Registry Key Value. This simply looks for the existence of a key, but not the value of that key. For example if you have the Office 2007 Compatibility Pack to deploy you may simply want to check for the existence of a major version of office and not be concerned on the minor updates or service packs.
- Registry Key to File Version - As the name implies this allows a check against a version of a file if it is stored in the registry. The operators allow you to specify how the rule works with what is found.
- Registry Key Value - This is the most common rule I've seen used. In the below example this Rule will be implemented.
- Registry Key Version - I recommend using the Registry Key Value as it is more straight-forward. If the version is not a String, however, this Rule should be used.
- Registry Key/File Path to File Version - This is a more complex rule that allows you to compare a registry entry with a file version.
- Registry Key/File Path to Product Version - This rule allows you to check a Product Version as found in the Registry.
- Windows Language - This rule allows you to target only the language you need to, whether for an application installation or an update that is language specific.
- Windows Version - This allows you to ensure that either you are running against the right version of windows, or that you are not running against the wrong version of windows. This is especially useful for Windows Updates.
For the Detection Rule example, we'll use the Registry Key Value option since it is very dynamic in its uses.
- Launch the Editor for the Software Resource you wish to add the Rule to.
- Under the Rules tab, click the New button (yellow asterisk) next to the Detection Rule dropdown.
- Name the rule so it is easily recognizable. For example SQL Server 2008 Detection.
- Click the Add a new rule expression button (the blue plus +), move under the Standard Rule section, and click on Registry Key Value.
- Provide the Registry path. One way to ensure path reliability is to browse in the registry on a system that has the software installed, using the following steps:
- Go to Start > Run > Type regedit > Click OK.
- Browse in the Registry hives in the left pane to the Key you will be evaluating for the rule.
- Right-click on the key and choose Copy Key Name.
- d.Go back to the Rule setup and Paste in the copied key name. This will give you the proper path.
- Provide the Registry entry. This is the name of the value within the Key specified in the previous step.
- Provide the Value of the key.
- The Match criterion is defaulted to Entire String. To make this rule more dynamic, you can choose Substring to allow partial matches. For example if you want all versions of SQL matching 9.00, you can put this in and any version, such as 9.00.3042.00, will be considered a match.
- Click OK to add the criterion. This screenshot shows an example:

- Click OK to save the Rule. Note that you can have multiple detection points for a rule. This allows more granularity to ensure the target system correctly evaluates if the Software in question is installed or not.
The Registry rules are provided only for String values. DWORD or other value types are not supported and will not correctly fire.
For the Applicability Rule example, we'll use the Windows Version option as this is a common Applicability Rule I've seen used.
- Launch the Editor for the Software Resource you wish to add the Rule to.
- Under the Rules tab, click the New button (yellow asterisk) next to the Detection Rule dropdown.
- Name the rule so it is easily recognizable. For example SQL Server 2008 Detection.
- Click the Add a new rule expression button (the blue plus +), move under the Standard Rule section, and click on Windows Version.
- You can select a specific Windows server suite type using the checkbox and options under Check for Windows server suite types.
- Check the box Check Windows version and/or machine role.
- In the Major field place the major version number for the version of Windows you are targeting. In this example we're using Windows 2008, the value of which is 6.
- In the Minor field put the minor version number. In this example 2008's value is 0.
- Click OK to save the criteria. The following screenshot shows the configured Rule:

- Click OK to save the Rule. As with a Detection Rule you can specify multiple criteria.
Rules add great intelligence to Software Management. It is highly advised to test a Rule before rolling it out to ensure the rule accurately detects, or NOT detects, the given Software it is associated to. Testing both True and False for the rule will ensure it doesn't detect software as being there when it isn't, or detects it as not being there when it is.
Associations
Associations allow the linking of different Software Resources. For example if you have a Software Resource for SQL 2008, you can create a second Software Resource for SQL 2008 SP1 and select it as an Update to the SQL 2008 Resource. The following Association Types are available:
- Conflicts with - Using this Rule you can avoid installing Software that has known compatibility issues with existing Software. This will help Administrators know what Software should not be installed together on a target computer.
- Contains - To help manage what updates or resources contain multiple items that may already exist as stand-alone, use the Contains Association to track these.
- Depends on - This Rule can automate the running of Prerequisites for the Software Resource. For example if a particular application requires the JRE (Java Runtime Environment) you can create a Software Resource that deploys JRE. That JRE resource will be referenced as a Depends on association to the primary Software Resource.
- Software Channel Targets Software Release - I could not find a use-case or documentation on this Association.
- Supersedes - This is particularly applicable for roll-up hotfixes or updates. You can select all updates that are contained in the rollup by using this Association Type.
- Updates (Service Packs) - You can add Resources that add a Service Pack to the editing Software Resource. With these associations you can automatically update your install base. The Managed Software Delivery Policies referencing the Resource can have the Service Packs added.
- Updates (Software Updates) - This is the same type of Rule as Service Packs for individual Updates to the Software Resource.
For this article I'll detail adding an Update to a Software Resource. The following example adds an update to Microsoft SQL Server 2008.
- Launch the Editor for the Software Resource you wish to add the Association to.
- Click on the Associations tab.
- From the Associations Type dropdown select Updates (Software Updates).
- Click the Add button under the heading Software resources that update this software resource.
- In the resulting window use the search function to find the Update to apply.
- Once found, highlight the update in the left-hand pane and click the greater-than symbol > to add that update. See the following screenshot for an example. You can use multi-select with Ctrl to add more than one update at a time.

- Click OK to make the Association.
- Done!
Do not create circular references between Software Resources, as this may cause problems with the Software Resource. For example, it appears possible to add the Update to the main Software Resource, and add the Software Resource as being updated by the Update. You only need to make one link, and generally from the main Software Resource for the applicable Software.
File Inventory
File Inventory has two primary purposes:
- Provide data to be used by Detection or Applicability Rules
- Provide executable information for Application Metering for both monitoring and blacklisting (denying execution) applications.
How files are added depends on which processes are in use in the environment. The following methods populate this information:
- You can add files manually through a local browse on the server (with the ability to network browse)
- Use data captured through Inventory Solution's Audit Scan
- Use Software captured by the Software Discovery process Inventory Solution executes
- For MSIs the data is automatically populated when the Software Resource is deployed through a Managed Software Delivery Policy
The Browse function requires the JRE (Java Runtime Environment) as discussed concerning using the Software Library as the Package Source. As a reminder the JRE needs to be available on the system running the console, whether remote or local.
To add a Database File, follow this process:
- Launch the Editor for the Software Resource you wish to add the File Inventory item to.
- Select the File Inventory tab.
- Click the Add button.
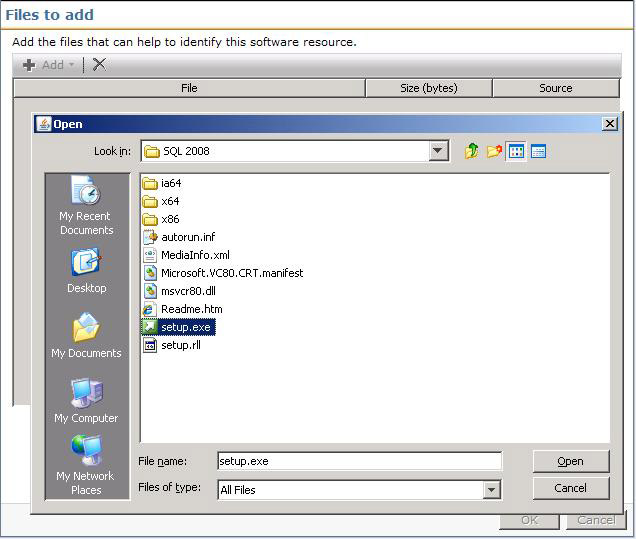
- In the resulting Window click Add > Server file.
- A new window will pop up providing a search/selection window for what Application files are known by the Notification Server. See this screenshot for an example:

- Use the Search field to narrow your search to find the file needed. If you cannot find the file you need, use the Local browse method to add the file details to the Software Resource.
- Click OK to add the File. Repeat the steps as needed, and/or if you also want to include Local Files see the next section detailing the process.
- Done!
To add a File you've browsed to, follow this process:
- Launch the Editor for the Software Resource you wish to add the File Inventory item to.
- Select the File Inventory tab.
- Click the Add button.
- In the resulting Window click Add > Local file.
- The resulting browse window uses the JRE. You can browse the local Server, or put in another path (UNC or through the Network object). See this screenshot for an example:
- Once you've located the applicable file, select it and click Open.
- The file will be added to the list. Click OK to add the selected files to the Software Resource.
- Done! Don't forget to click Save changes on the Software Resource.
Software Publishing
This tab controls Software Portal access for this Software Resource. Please see the section on the Software Portal for information on how to use this feature.
Quick Delivery
As the name implies, Quick Delivery is primarily used for single Software Deployment events. Other uses, such as running commands or other scripts, can also be used. This is not considered a "Managed" method of deploying Software. Running primarily on Task Server, Quick Delivery Tasks use the Site Server method of quickly deploying a package and command to target clients. The Configuration options are limited on a Quick Delivery, noted in the processes below.
The basic creation of a Quick Delivery Task is covered below. While there are Wizards and contextual links that provide other methods, the base creation is covered here:
- In the Symantec Management Console, browse under Manage and select Jobs and Tasks.
- In the right-hand tree, browse under Jobs and Tasks > System Jobs and Tasks > Software > and select Quick Delivery.
- Right-click on Quick Delivery and choose New > Task.
- From the left-hand pane in the resulting window, browse down to the Software section (folder) and select Quick Delivery.
- In the right-hand pane Name the Quick Delivery Task so it is recognizable when you need to go back to it.
- In the Software Resource multi-function field type in the name or use the drop down to select the Resource to use.
- Use the field adjacent to Command line to select the appropriate command line for the Task to run. Be sure to pick the right one if you have different types created in the Resource.
It is advised to review the command-line under the field. It will show you what command will execute, and can help avoid picking the wrong command-line. Running an uninstall when you're trying to install is quite ineffective.
- Use the Package field to select the Package to use. Since a Software Resource can have more than one package this step is required before saving a newly created Quick Delivery Task. See this screenshot for an example:
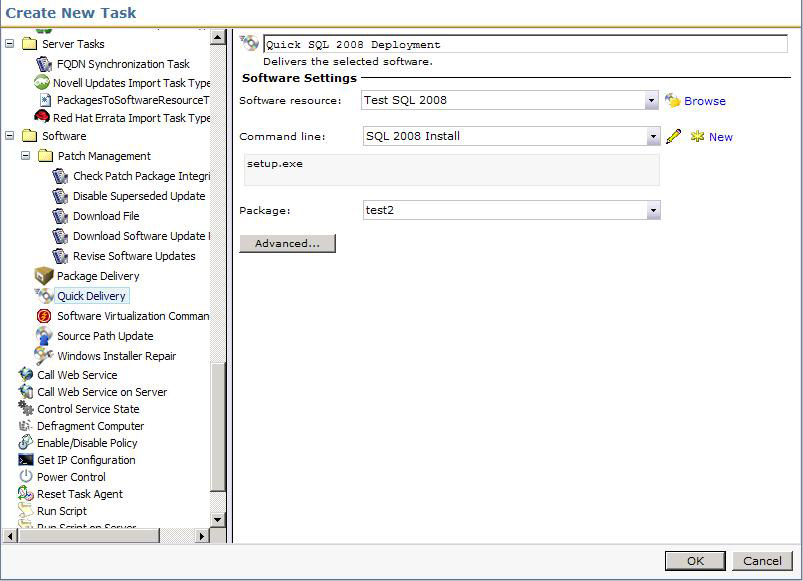
- Click Advanced. Use the next section to configure the Advanced section.
- When completed, Click OK to save the Task.
Advanced Configuration
After the Task is set, the Advanced options provide fine tuning of the Task, and can change drastically how the Task runs. This section covers the different options and how they affect the Task. First I'll details the options, and then provide a walk-through for some of the more popular options.
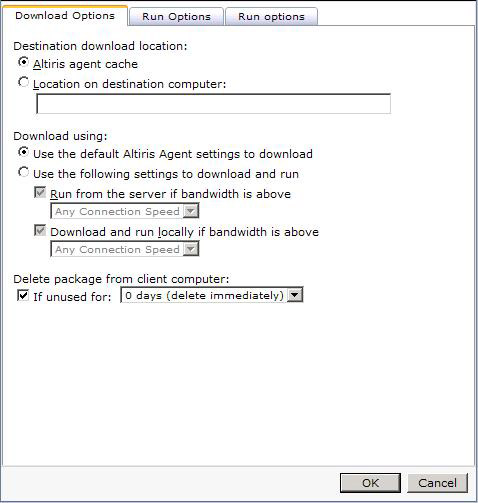
Download Options
By default the Altiris Agent will download files to the following location: install_path\Program Files\Altiris\Altiris Agent\Agents\SoftwareManagement\Software Delivery\. Each package is placed inside a folder matching the GUID of the Package and a subsequent Cache folder. At times an administrator may want to put the package in a non-default location. Change the Destination download location radial to Location on destination computer. The path will be local relative to the target systems.
The Download using: options present a unique situation. In versions 6.x the defaults found here were also found under the Altiris Agent Configuration Policies. This is no longer the case. The settings for Downloading in the Altiris Agent Configurations and the options here are exclusive. While it does add to confusion, it allows you to configure more options than previously. There are two primary use cases for manipulating the options here:
- Control limited bandwidth between the Package source and target clients, particularly in WAN environments or poor VPN connections.
- Have the execution occur locally directly from the Package Server instead of downloading it first.
The two checkboxes can be checked, giving the appearance that the two settings can be used together. Since they are talking about the opposite end of the download or run remote equation, you should only use one at a time.
The option: Delete package from client computer can be used to control how long the source files are available. For most Quick Delivery Tasks an immediate delete fits the use-case model. This may not be the case, so consider how long the source files should stay for the circumstance and set it appropriately.
The nature of Quick Delivery Tasks suggests you'll only need the files for the Installation. Check the option to delete the package as it is not checked by default. One type of exception is for those applications that install via an MSI and where the Source files may be needed in the future.
Run Options (Left tab)
The Run As options provides options for what user context will be used for the installation.
The default option on a Quick Delivery is logged on user. This default will not work for users who do not have install rights on their local systems. It is advised to change this when configuring a Quick Delivery Task for the first time.
Generally the Altiris Agent credentials are sufficient for an install. Since the package is downloaded, all necessary rights exist on the local system. Some exceptions to this are details here:
- The install accesses network resources or location during the install. This does not include the ability of the application to contact network resources after the installation.
- The source files for the install will be executed from a remote location, such as a UNC or the option to execute from the Package Server is selected.
- The application must be run under the User's context that will launch the application for use.
For the first two use-cases, Specific user should be used, one that has rights to the resources or network locations to be used during the execution. For the last one the execution must be set to Current logged-on user.
If the users do not have installation rights to their systems, and you have an application that only works when installed under the user's own context, use a Managed Software Delivery Policy (MSD). The MSD can be configured with current user credentials and it will elevate the install session for that user to allow the install to proceed.
Run Options (Right tab)
The two options under this second Run Options tab include the ability to have Task Server execute other Tasks while this one is executing, and to define the length of the execution.
This options, End task after __ minutes, is important to note. The default may not work for a larger install. 30 minutes works for short installs, but larger packages with longer installs may exceed this amount.
When the Quick Delivery Task executes, it first has to download the Package. The download time is calculated into the Task kill setting. Set the length for enough time for the targets to download the package and execute the command-line successfully.
Walkthrough
The following process uses common settings to configure the Advanced options.
- Select the Quick Delivery Task to configure, or if you are still in the creation process, click the Advanced button.
- Under the Download Options tab, under the Delete package from client computer settings, check the box labeled: If unused for:.
- From the drop down select an appropriate length of time. For this example I left 0 days selected. NOTE: This option doesn't immediately delete the package, but a maintenance process will remove them soon after the execution. See this screenshot for an example:
- Click the middle Run Options tab.
- Change the option to Altiris Agent credentials.
- Uncheck the option Allow user interaction. In most cases I've worked with administrators have not wanted users to see an install as this often generates a Helpdesk call.
- Click the right side Run Options tab.
- Change the designated minutes to 60. This gives clients more time to download and execute the task. This setting will solely depend on environmental and situational elements, including:
- How soon Package Servers will have this package available
- The size of the Package and how many files are contained within
- The length of the Execution on target systems
- Click OK to save the changes.
- If newly creating a Task, Click OK to create it. If editing an existing Task, click Save changes to apply the new settings.
Targeting and Scheduling
The targeting for a Quick Delivery uses the common Task Server scheduling controls. If you are familiar with this, the following walk-through should be familiar. The scheduling also uses the standard Task Server controls.
Manual Selection
To add targets to the Task and schedule the execution, follow these steps:
- Browse to the Quick Delivery Task to schedule/execute.
- Under the setting page, under the Task Status section, click on New Schedule.
- Choose Now or a specific schedule using the radial button and applicable controls. Due to the nature of a Quick Delivery, for this example I'll use Now.
- Under the Input section, click Add v > Computers or Devices. If you have a Target saved of systems to use, you can alternately use Target from the dropdown and link to it. Use this screenshot for reference:
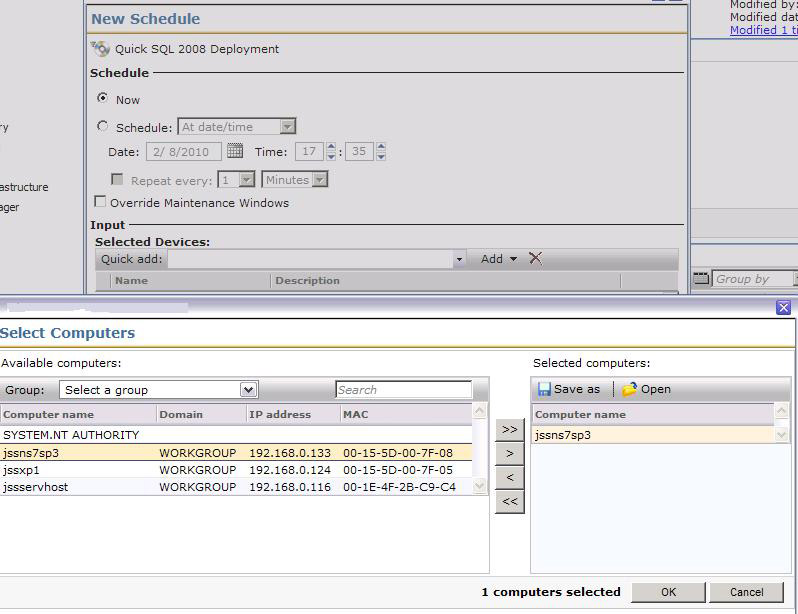
- In the resulting window select the systems you wish to run the job on. The following methods can assist in finding designated computers:
- Use the Group: dropdown to filter results by Organizational objects/views.
- Use the Search field to filter the results based on computer name.
- Multi-select computers using the Ctrl and Shift keys and use the >> button to transfer them over.
- Click OK once the computers you need are included.
- Click Schedule to commit the execution/schedule.
- The status can be reviewed in the Input section as each execution will be listed. Double-click on the entry to track the status of the Quick Delivery task.
In a large environment, obviously using the above method would be cumbersome and take significant time. Targets are the answer for this. Targets are dynamic collections of computers. The following example shows a basic Target being created.
Targets
- Browse to the Quick Delivery Task to schedule/execute.
- Under the setting page, under the Task Status section, click on New Schedule.
- Choose Now or a specific schedule using the radial button and applicable controls. Due to the nature of a Quick Delivery, for this example I'll use Now.
- Under the Input section, click Add v > Target.
- Click the Add Rule button.
- Leave the selection exclude resources in, and the type to Filter.
- Type Windows Servers and click the dropdown arrow in the third field.
- Select Windows Servers from the dropdown.
- Click Update results to see what is returned. See this screenshot for an example:
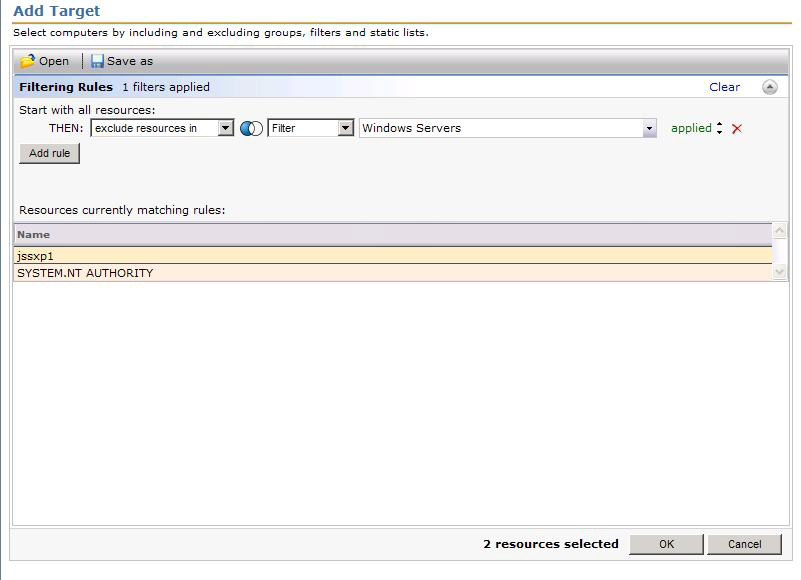
- Click OK to apply the Target.
- Done! You can now execute the task or set the schedule for execution.
Task Server
Task Server is the engine behind Quick Delivery Tasks. These Tasks are no initiated on the Altiris Agent side, but are pushed down from the Target system's Task Server at the scheduled time. The process is as follows, in high level view. Use the previously covered items to fill in the specifics on this process:
- An administrator configures a Quick Delivery Task by choosing a Software Resource and a Command Line.
- A Filter, or basically a collection of computers, is selected to receive the Task.
- A schedule is set. More popularly, the "Now" option is used.
- The Notification Server passes the Task to the applicable Task Servers.
- The Task Servers take the Task and pushes it down to the Client Task Agent running within the Altiris Agent at the Target Systems.
- The Client Task Agent accepts the Task and executes the Task.
- This Agent first employs the Package download mechanisms within the Altiris Agent to download the package.
- Once the package is downloaded, the Command-line is executed per the configuration within the Software Resource.
- The execution completes and provides the applicable exit code back to the Client Task Agent.
- The Client Task Agent passes the status up to the Task Server.
If your Task Server environment is healthy and properly distributed (Site Servers configured to spread the load out) the Executions should begin in real time. Latency is minimized and the completion of the Task should occur quickly when you allow for the length of the execution.
Managed Software Delivery
Managed Software Delivery Policies are the intelligent way to deploy and manage software. These policies are versatile, and enable you to make use of the functionality discussed in configuration terms about the Software Components. Unlike Quick Delivery Tasks, Managed Software Delivery policies are Agent-based. The policies and executions are tracked on the Agent side.
General Configuration
Setting up a basic Managed Delivery policy is easy. Most of the configuration is done on the front end when you create the Software Resource. The following walkthrough takes you through the basic setup of a Managed Software Delivery (MSD) Policy.
- In the Symantec Management Console browse under the Manage menu > click of Policies.
- In the left-hand pane browse down through Policies > Software > and select Managed Software Delivery.
- In the resulting right pane click the + Add button.
- Name the Policy. As the name is not initially selected it is easy to fail to name it, which results in confusion. Click on the default name New Managed Software Delivery to activate the field.
- If desired, add a description by clicking on Add description found below the Name field.
- Under the section Policy Rules/Actions, under the Software tab, click the + Add button and select Software resource.
- In the picker use the Search field to find the applicable or desired Software Resource and click OK. See this screenshot for an example of an added Software Resource:

- Scroll down and open the Applied to section by clicking on the expand/shrink arrow button.
- Click Apply to v dropdown and choose Computers.
- The Filter interface should be familiar if you walked through the Quick Delivery section concerning creating a Target. Add machines using the same method described on page 32.
- You should now see a row for the Computer List you just created, including a Count column that shows you how many machines are targeted for the Policy.
- Scroll down and open the Schedule section by clicking the arrow button.
- Click the Add schedule v Dropdown and select an appropriate Schedule option. The different settings here will be covered later.
- After adding a schedule, browse back to the top and be sure to turn the Policy on by clicking on the On/Off toggle dropdown and selecting On.
- Click Save changes to save and commit the policy.
Software Resource Settings
After you've added a Software Resource to a Managed Software Delivery Policy, you have a myriad of options in how the policy interacts with the Software Resource during detection and deployment. This section covers all the settings involved. When selecting a Software Resource in the Rules/Actions list, the right-hand pane presents the settings surrounding the Resource.
Compliance settings
By default the Compliance Settings will automatically choose what Detection Rule was selected during the creation of the Software Resource. You can toggle the detection on or off by checking or unchecking the box labeled: Perform software compliance check using:. You can also manipulate the detection rule by clicking on the hyper link named after the Detection Rule name. You will see the View Rule dialog, which allows you to edit the Expressions and rules defined.
WARNING: Changing a Detection Rule in this window will result in the Software Resource being updated with the changes. Only make changes that you wish to make to the Software Resource directly.
Remediation settings
By default the Install Command-line is selected in the Command-line dropdown. If the Resource has more than one command-line, use the selection dropdown to choose the appropriate one. Below the dropdown the Command-line is listed for reference so you can ensure you've selected the right one. The Package dropdown allows you to select a different Package if the Software Resource has more than one Package defined. For most use cases typically only one package is required.
A secondary scheduling options is provided within the option labeled, Override policy remediation schedule:. Check this box if you wish the Remediation to act outside of what is defined in the main schedule for the Managed Software Delivery Policy. The options are:
- Immediately - This allows you to bypass Maintenance Windows if the associated Software Resource is a critical application, such as Symantec Endpoint Protection. If SEP is not detected as installed any longer, redeploying is crucial to ensure the target system is properly protected.
- At next maintenance window - This allows finer control for how the Policy interacts with the Maintenance window. You can choose to schedule it for the next Maintenance Window instead of running immediately.
- Do not run remediation - If desired, you can disable any remediation and simply use the detection check as a reporting mechanism so you can track what systems no longer have the software installed.
- Note that the Advanced Options are covered in the next section.
Supersede settings
The two checkboxes listed here allow greater control of how updates and newer versions are handled in regards to the Policy. The logic to allow automatic update or to avoid applying a lower version than what's already installed avoids any issues stemming from the wrong versions being applied.
- Automatically upgrade software that has been superseded by this software - Any software detected that this software supersedes will initiate the update.
- Do not install if a newer version of this software is already installed - This uses any Software Resources marked as superseding the selected Resource.
Note that the options will be grayed out if no Supersede associations are found for the selected Software Resource.
Advanced options
At the bottom of the Remediation settings section Advanced options are offered. While these are similar to those Advanced Options covered earlier for Quick Delivery Tasks, there are key differences. This section covers the different options and how they affect the Policy. First I'll details the options, and then provide a walk-through for some of the more popular options.
Download Options
By default the Altiris Agent will download files to the following location: install_path\Program Files\Altiris\Altiris Agent\Agents\SoftwareManagement\Software Delivery\. Each package is placed inside a folder matching the GUID of the Package and a subsequent Cache folder. At times an administrator may want to put the package in a non-default location. Change the Destination download location radial to Location on destination computer. The path will be local relative to the target systems.
The Download using: options present a unique situation. In versions 6.x the defaults found here were also found under the Altiris Agent Configuration Policies. This is no longer the case. The settings for Downloading in the Altiris Agent Configurations and the options here are exclusive. While it does add to confusion, it allows you to configure more options than previously. There are two primary use cases for manipulating the options here:
- Control limited bandwidth between the Package source and target clients, particularly in WAN environments or poor VPN connections.
- Have the execution occur locally directly from the Package Server instead of downloading it first.
The two checkboxes can be checked, giving the appearance that the two settings can be used together. Since they are talking about the opposite end of the download or run remote equation, you should only use one at a time.
The option: Delete package from client computer can be used to control how long the source files are available. For most Quick Delivery Tasks an immediate delete fits the use-case model. This may not be the case, so consider how long the source files should stay for the circumstance and set it appropriately.
The nature of Quick Delivery Tasks suggests you'll only need the files for the Installation. Check the option to delete the package as it is not checked by default. One type of exception is for those applications that install via an MSI and where the Source files may be needed in the future.
Run
The Run As options provides options for what user context will be used for the installation.
The default option on a Managed Software Delivery Policy is logged on user. A Managed Software Delivery will use the Altiris Agent credentials to elevate the execution from a logged on user that will allow this configuration to work even for users that do not have install rights.
Note that we execute in a separate session so any rights elevation will not be usable by the logged on user. We have seen occasional rights issue despite the elevation, so unless there is a reason to target the logged on user, it is advised to change this when configuring the Managed Delivery for the first time.
Generally the Altiris Agent credentials are sufficient for an install. Since the package is downloaded, all necessary rights exist on the local system. Some exceptions to this are detailed here:
- The install accesses network resources or location during the install. This does not include the ability of the application to contact network resources after the installation.
- The source files for the install will be executed from a remote location, such as a UNC or the option to execute from the Package Server is selected.
- The application must be run under the User's context that will launch the application for use.
For the first two use-cases, Specific user should be used, one that has rights to the resources or network locations to be used during the execution. For the last one the execution must be set to Current logged-on user.
For applications that only work when installed under the user's own context, use the configuration Current user credentials and it will elevate the install session for that user to allow the install to proceed.
User run conditions allow greater control over how and when the policy executes. The following options are available:
- Task can run: - This option allows an administrator to control in what state the system is in for execution regarding user log on. Scenarios include:
- Only when user is logged on - This is the only option if you selected Current logged-on user under the Run As section, though if you selected another Run As you can still specify this to ensure someone is logged on when the execution occurs. This is important if your installation requires some sort of user interaction when it executes.
- Whether or not the user is logged on - This option is used to allow the install no matter what user state the system is running under. This one will allow the policy to execute the soonest.
- Only when no user is logged on - This allows an administrator to restrict resource intensive installs to run when no user is actively using the system.
Option C can cause difficulties depending on how users manage the power state of their computers. For example if they log on quick enough after booting up the computer the execution may miss the small window of opportunity. Also if users don't typically log out, but shut down their systems at the end of the day, this can also delay the remediation.
- Repeat this task for each logged on user - if the installation you are running requires to run under the user's profile to apply correctly, this option is very useful to ensure it runs for every user who uses the system.
- Allow user to interact with installation software - To put it simply, this pipes the execution to the User's desktop, running in interactive mode. You can also select how the execution shows, from the following list:
- Normal
- Hidden
- Maximized
- Minimized
NOTE: This functionality was modified in SP1 for Software Management Solution. This can only be checked if the option Only when user is logged on is selected. This is being reviewed and will likely be reverted back to allow this option to be selected no matter the Task can run setting.
- Prompt user before running - This setting allows the user to defer the execution. This helps mitigate any work the user is conducting when the installation begins to happen. Users can save their work before the installation to avoid any potential data loss.
This screenshot shows a typical configuration of this tab:

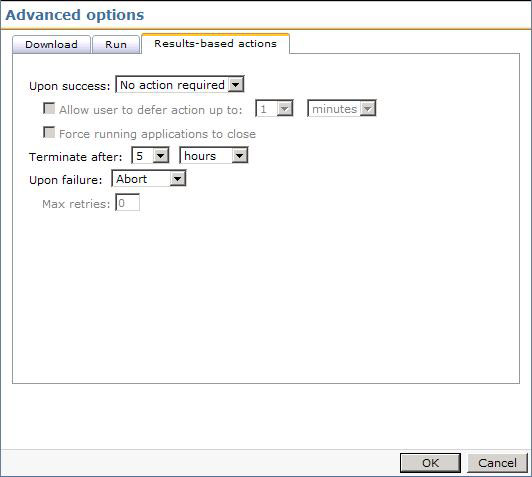
Results-based actions
Outside of the actual execution of the Software Resource, these settings allow how the Altiris Agent and Plug-ins interact with the task.
- Upon success: This allows the Task to execute a Log off or reboot of the system after a successful completion.
It is highly recommended to allow the Altiris Agent to initiate a reboot. This allows the Agent to properly handle all Agent processes so nothing is lost on the reboot. For example the progress of the Managed Software Delivery may be lost if the installer executes the reboot. In the command-line suppress the reboot and select the Upon success option to initiated the reboot.
- Allow user to defer action up to: Use this option to allow the user to save and make any other preparations for the reboot. This is highly recommended when configuring a reboot to minimize user disruption.
- Force running applications to close - If an open application prevents the shutdown, this option will forcibly end the application to conduct the reboot. Use with caution.
- Terminate after: This option is a fail-safe to prevent hung or sluggish installs from locking up the Altiris Agent Policy queue. Generally putting in a value that is safely beyond the expected execution time, but not too long to paralyze the Agent, should be used.
- Upon failure: The following selections are available:
- Abort - This will stop the MSD from continuing. If you've configured more than one resource or task in the MSD, any subsequent items will not be run.
- Continue - this will instruct the MSD to continue on to subsequent items in the MSD.
- Restart - This will retry the remediation execution. Max retries should be set to an appropriate number.
Walkthrough
The following process uses common settings to configure the Advanced options of a Managed Software Delivery Policy.
- Select the Managed Software Delivery Policy to configure, or if you are still in the creation process, click the Advanced options button under the selected Software Resource.
- Under the Download Options tab, under the Delete package from client computer settings, check the box labeled: If unused for:.
- From the drop down select an appropriate length of time. For this example I left 0 days selected.
This setting only comes into effect when the Managed Software Delivery Policy no longer applies to the targeted system. This means under normal circumstances the package will not be deleted. If you use a dynamic filter, or you disable the policy, then the setting will apply to the Package.
- Click the Run tab.
- Change the option to Altiris Agent credentials.
- Uncheck the option Allow user interaction. In most cases I've worked with administrators have not wanted users to see an install as this often generates a Helpdesk call.
- Check the option Prompt user before running.
- Check the option Allow user to defer up to a total of.
- Input an appropriate length of time, such as 30 minutes or 1 hour.
- Click the Results-based actions tab.
- Change the Terminate after: setting to 5 hours.
- Change the option Upon Failure to Continue. See this screenshot for an example:
- Click OK to save the changes.
- If newly creating a Managed Policy, Click OK to create it. If editing an existing Managed Policy, click Save changes to apply the new settings.
Task Settings
You can also add any Task Server Task to a Managed Delivery. The following example illustrates how to accomplish this:
- In the Managed Software Delivery Policy, under the Policy Rules/Actions, Software tab, Click the + ADD button and select Task
When adding a Task, do not have a Software Resource selected or the Task will replace it. If the Resource is selected you can deselect it by moving to another section such as Applied to.
- Select the desired task from the list. Use the Search field to narrow the results if necessary.
- The Task will be added to the list. For sequencing information, see the subsequent section. See this screenshot for an example:
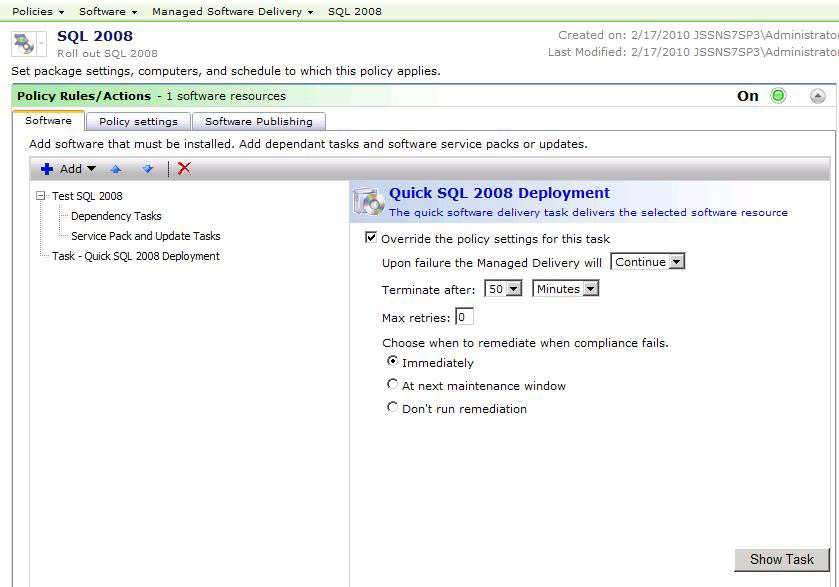
- You have the ability to override the policy settings for the task. The following walkthrough provides an example with use-case information explained.
- Check the box Override the policy settings for this task.
- Choose Continue from the dropdown next to the label Upon failure the Managed Delivery will.
- Change the Terminate after setting to 50 Minutes.
- Leave the other settings as is.
- If you need to adjust the Task itself, you can click the Show Task button in the lower right.
- Be sure to Save changes when you've completed the Task configuration.
Sequencing
Managed Software Delivery Policies allow a sequence of Software Resources and/or Tasks. This allows grouping of like executions or a string of executions to create a more comprehensive job. The following 2 primary use cases explain benefits of using a Managed Software Delivery in this manner:
- Complex Software Management - For software that contain a base install and multiple updates, service packs, plug-ins, and/or add-ons creating one MSD to manage the rollout of all the components will simplify the rollout.
- Core Software Management - Most companies have a core set of software that all Users should have available. This usually includes Microsoft Office, Cisco or other VPN client, Anti-virus Software (Symantec Endpoint Protection being one good example), branded version of Internet Explorer, etc.
Be selective when you add multiple Resources and Task to a Policy. The more action points in a job, the greater chance to run into issues. The greater the complexity will also factor in, creating more potential points of failure.
To illustrate how this can be used, I'll provide a walk through for each of the use cases listed above. This first example uses Microsoft Office for an example. Note that the steps are in the order the options appear (to avoid excessive scrolling back and forth).
Complex Software Management
- Create Software Resources for the following components:
- Microsoft Office 2007 Enterprise Edition
- Microsoft Office Visio Professional 2008
- Microsoft Office 2007 service pack 1
- Microsoft Visual Studio 2008 Service Pack 1
- Ribbon Customizer for Office 2007 - v4.0
- Classic Menu for Office 2007 - v4.52
- Create detection rules for each Resource. If the install has an MSI Product Code associated with it, that is one Rule to use for detection. Another example are registry keys. For example, for Office 2007 you can use the key:
HKEY_LOCAL_MACHINE\SOFTWARE\Microsoft\Office\12.0\Common\ProductVersion, with a value name of Lastproduct. You can specify a specific value, or simply use the existence of that key.
- Create the following Service Pack Associations within the associated Software Resources:
- Browse to the Software Resource for Microsoft Office 2007 Enterprise Edition.
- Click on the Associations tab.
- From the Association Type dropdown, select Updates (Service Packs).
- Under the caption, Software resources that update this software resource, click the + Add button.
- From the list, locate the Software Resource for Microsoft Office 2007 service pack 1.
- Select and click the > button to move the Resource over to the right-hand pane.
- Click OK to save the association.
- You should see the association now represented in the list, as shown in this screenshot:
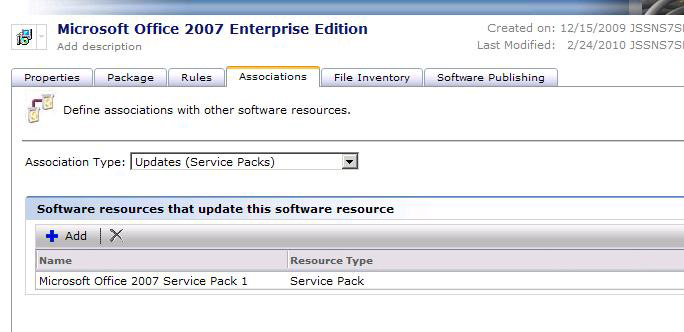
- Click Save changes on the main Software Resource page to complete the process.
- Now go back through steps a through I except use Visio as the Parent Resource, and Visio SP1 in the association of the Visio Resource.
- Create the following dependent associations:
- Browse to the Software Resource for Ribbon Customizer for Office 2007 4.0.
- Click on the Associations tab.
- From the Association Type dropdown, select Depends On.
- Under the field labeled Software Resources that this Software Resource depends on, click the Add + button.
- All Software Resources are shown on the resulting page, so use the search filter to find Microsoft Office 2007 Enterprise Edition.
- Select Office and use the > button to move it over to the selected right pane, as shown in this screenshot:

- Click OK to apply the new association.
- Click Save changes on the main Software Resource page to complete the process.
- Now go back through the steps, but choose the Software Resource Classic Menu for Office 2007 - v4.52 to add the 'depends on' association to.
- Create a new Managed Software Delivery Policy (MSD).
- In the Symantec Management Console, browse under Manage > Policies.
- In the left-hand tree browse under Policies > Software > and select Managed Software Delivery.
- In the resulting right-hand pane click the Add + button.
- In the Name field, provide a name, such as: Office 2007 Bundle.
- Turn the Policy On by clicking the red/green switch and clicking On.
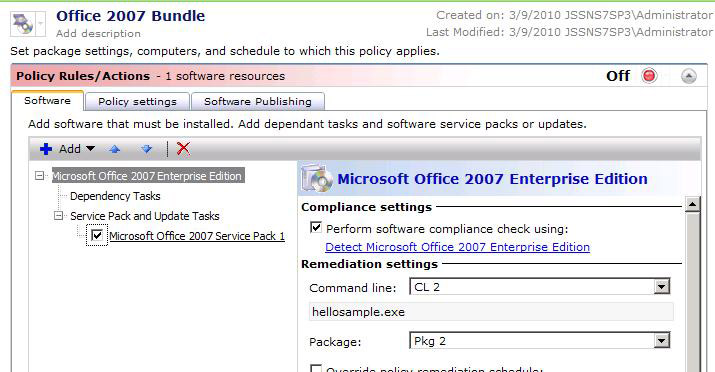
- Click the Add + button and choose Software resource.
- Use the Search filter, if necessary, to locate and select Microsoft Office 2007 Enterprise Edition.
- Click OK to add the resource to the MSD.
- Note that by default a command line and package will be selected. A Detection rule will also be selected, so ensure all settings are as you intend them. Normally this is not an issue unless you have multiples of any item.
- Check to ensure the Service Pack shows up under the Software Resource, as shown in this screenshot:
- Click the Add + button and choose Software resource.
- Use the Search filter, if necessary, to locate and select Microsoft Office Visio Professional 2008.
- Click OK to add the resource to the MSD.
- Click the Add + button and choose Software resource.
- Use the Search filter, if necessary, to locate and select Ribbon Customizer for Office 2007 - v4.0.
- Click OK to add the resource to the MSD.
- Click the Add + button and choose Software resource.
- Use the Search filter, if necessary, to locate and select Classic Menu for Office 2007 - v4.52.
- Click OK to add the resource to the MSD.
- Ensure the Software Resources are in the right order. Select and move entries using the up and down arrows. This screenshot shows the finished list:

- For the Advanced options for each Software Resource, see the previous section labeled Advanced options.
Ensure you go through the Advanced options for all resources added to a MSD. For example if an Office Add/on is only applicable per user, you may need to change the Execution environment to run as the Logged-on User in order to have a successful deployment.
- Expand the Applied to section.
- Add a filter to the Policy. For this example we'll apply it to all Windows Computers.
- Click the Applied to button, and choose Computers.
- Click the Add Rule button.
- Change the 1st option to Exclude all computers not in.
NOTE: The double-negative usage may be confusing. To put it into perspective, note that the Filter starts including all computers, thus the wording, while not intuitive, is accurately labeled in the context.
- Leave the 2nd option on Filter.
- In the right field type Windows 2000, and click the dropdown arrow.
- Choose the filter Windows 2000/XP/2003/Vista/2008/7 Computers.
- Click the Update results button. You should see a list of applicable computers, as shown in example on this screenshot:
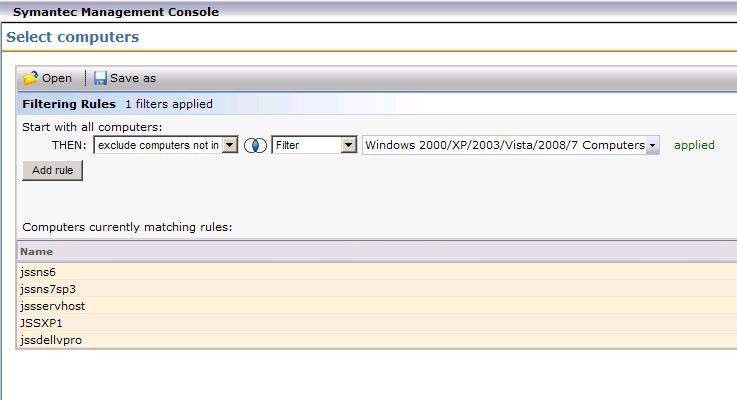
- Click OK to apply the filter.
- Expand the Schedule section.
- Add a schedule to the MSD. The schedule in this example will be a reoccurring one that runs daily. This allows computer to check for compliance once a day.
- Click Add Schedule and select Scheduled Time.
- Input a time of day best suited to run the install. I this example I chose 18:00 (6:00pm).
- Click the hyperlink default label: No repeat.
- From the dropdown in the resulting prompt, choose daily, as shown in this screenshot:

- Click OK to add the repeat setting.
- Click Save changes at the bottom to complete the process!
Core Software Management
This series will be a smaller subset of what was introduced under the Complex Software Management section previously covered. In this example I'm introducing a list of common software to deploy.
- Create Software Resources for the following components:
- Symantec Endpoint Protection
- Microsoft Office 2007 Professional
- Company branded Internet Explorer
- Cisco VPN Client
- Adobe Acrobat Reader
- Adobe Flash Player
- Create detection rules for each Resource.
- Create a new Managed Software Delivery Policy (MSD).
- In the Symantec Management Console, browse under Manage > Policies.
- In the left-hand tree browse under Policies > Software > and select Managed Software Delivery.
- In the resulting right-hand pane click the Add + button.
- In the Name field, provide a name, such as: Common Software Suite.
- Turn the Policy On by clicking the red/green switch and clicking On.
- Go through the following process for each of the Software Resources to add to the Policy.
- Click the Add + button and choose Software resource.
- Use the Search filter, if necessary, to locate and select Microsoft Office 2007 Enterprise Edition.
- Click OK to add the resource to the MSD.
- Note that by default a command line and package will be selected. A Detection rule will also be selected, so ensure all settings are as you intend them. Normally this is not an issue unless you have multiples of any item.
- Click the Add + button and choose Software resource.
- Ensure the Software Resources are in the right order. Select and move entries using the up and down arrows. In this example it is imperative to put Antivirus first!
- For the Advanced options for each Software Resource, see the previous section labeled Advanced options.
If one of the applications, such as Symantec Endpoint Protection, requires a reboot, suppress the reboot in the command-line and set a reboot as an after successful completion action within the Advanced options.
- Add a filter to the Policy
- Expand the Schedule section.
- Add a schedule to the MSD.
- Click Save changes at the bottom to complete the process!
As always, fully test your Managed Software Delivery Policy before attempting to roll it out on any medium or large scale. Tests will reveal issues and allow you to adjust the configuration to address them before full rollout.
Testing
Tracking the execution of an MSD on the client helps the testing and troubleshooting process. To access the UI and view the execution, follow these steps:
- On the client computer double-click on the Symantec Management Agent icon. If the icon is not visible (hidden per policy), browse under C:\Program Files\Altiris\Altiris Agent\ and execute AeXAgentActivate.exe.
- Select the Software Delivery tab.
- From the list of available software, highlight the MSD to view (Office 2007 Bundle in this example).
- The lower pane will show the progress of the MSD execution, as shown in this screenshot:
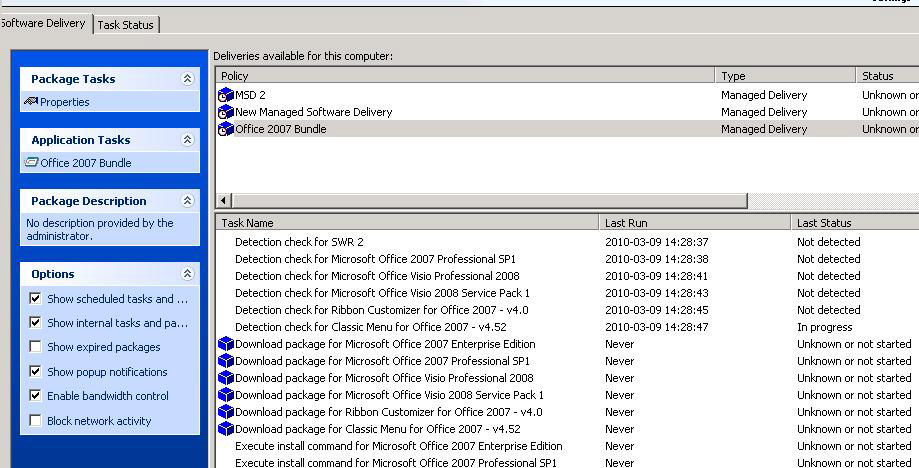
- To see the details of a particular download or execution, double-click on a line in the bottom pane that has a blue package icon next to it. You can review the details of the execution, including the download and run histories.
- The following screenshot shows an issue with a package download:
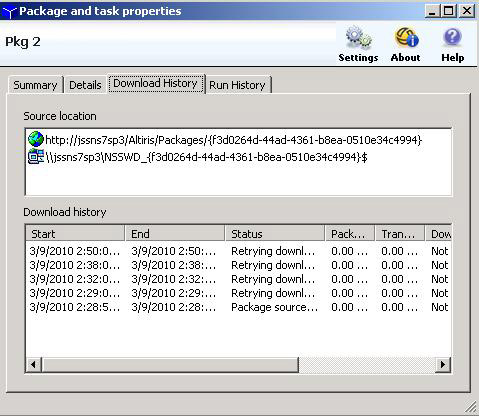
Rules
This section covers how Rules are executed within a Managed Software Delivery Policy.
- Detection Rules - Before anything else runs, the detection rules for an MSD runs. If an application is detected, the associated Software Resource will NOT be executed. The status will show as Detected.
- Consider this rule one that ensures you aren't rolling the same software to a system that already has it.
- Applicability Rules - For those resources that were not detected, if an Applicability Rule exists it will be executed against the system. Unlike Detection Rules, only if the Applicability Rule is detected will the MSD execute!
- A common Applicability Rule is Windows Version. The update or Software may not support Windows 7, for example, so the rule will only succeed on Windows systems that are not 7.
- Another type of Applicability Rule is an update to software that has to exist on the target system. This helps stop those executions that will fail the prerequisite check from throwing an error. Better if it doesn't run when it doesn't need to.
Rules add intelligence to the Software Management Process. In version 6.1 of Software Delivery, all intelligence had to be handled at the server end. Inventory provided what we knew was already on the system, and the NS provided the SQL logic in a Collection to automatically roll out Software to those systems that needed it. This was far from real-time and sometimes resulted in machines executing Software it didn't need or already had. It didn't take much to be out of sync between the Server and the client as Inventory had to update so the NS would know what had changed.
Rules execute real time, so they will know the moment they run if a system is compliant or not. If not compliant, it runs remediation to resolve the compliance issue.
Manual Execution
By default Managed Software Delivery Policies can be executed locally at the Agent User interface. This helps when troubleshooting an MSD execution or if you simply need to run a compliance check ASAP. The following process details how to execute the MSD manually:
- On the client computer double-click on the Symantec Management Agent icon. If the icon is not visible (hidden per policy), browse under C:\Program Files\Altiris\Altiris Agent\ and execute AeXAgentActivate.exe.
- Select the Software Delivery tab.
- From the list of available software, highlight the MSD to view (Office 2007 Bundle in this example).
- Look under the Application Tasks heading. The link here will execute the MSD immediately.
When executing an MSD in this manner, it does not mean the applicable Software Resources will automatically install. The same Rules are applied as in a normally scheduled delivery. Detection and Applicability checks will occur and influence what items run or are skipped.
Software Publishing
Managed Software Delivery policies can be requested from the Software Portal. This allows users to add an application or suite of applications for automatic deployment and management. This will be covered in detail under the Software Portal section of this document.
The Software Portal
The Software Portal in Software Management Solution 7.0 allows End-users access to initiate installs or make requests for software from a user-friendly interface. This allows users to:
- Install required software without IT interaction
- Request software for those applications where limited licensing exists
- See what software is recommended for them
- Request Software not listed within the Software Portal
- Request a Managed Delivery for application state management
- Request software for any system they log onto
Introduction to the Portal
What is the Software Portal? For those familiar with the Software Delivery 6.x Software Portal, what improvements have been made? What does the Software Portal look like and how does it operate?
What is the Software Portal?
The Software Portal is a web-driven interface End-users within the environment can automatically install software or request software. The portal is tied to a user's Domain User, showing only what software is available based on security assignments to that user and the groups they belong to. This allows administrators to control what users can install from the portal, all configured at the back end. For that software that requires tight control, the portal also provides the option to show software available by request. The request can then be answered by an administrator as approved of denied.
Improvements over the 6.x Software Portal
The 6.x Software Portal had limitations. The Portal was by far the top mechanism for feature requests submitted by administrators and users. This list details the improvements made in Software Management Solution 7.0:
- Ajax controls to bypass the need to install an ActiveX for the Software Portal to function.
- The ability to request unlisted software with a convenient informational interface.
- Software recommended for the user will automatically appear in the portal based off that user's Domain User account.
- Faster load times for environments with greater amounts of software available in the portal.
- A streamlined redesigned interface .
- Ability to customize certain features of the Portal, including adding a company logo.
Software Portal Interface
The Portal provides an intuitive interface. See this screenshot for an example of the Software Portal:

The software already listed when first loading the portal is considered Recommended for the user. Note the following concerning the controls of the Portal:
- The list under the Request Software section can be multi-selected using Shift and Ctrl.
- Click Request Software to request the selected software from the list below. The following window will appear:

If a listed entry does not contain a command-line, the following message is displayed:
You cannot request this software now. Contact your administrator.
- The Request Unlisted Software provides an interface for users to make an informational request for software not listed in the Software Portal. The form includes a Date required setting as shown in this screenshot:
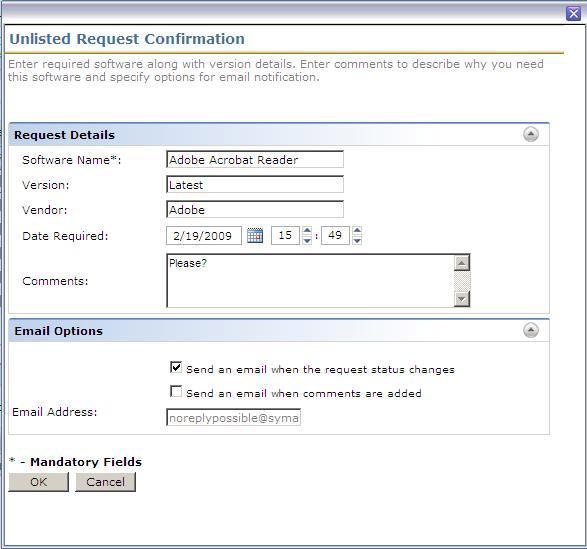
- There are two view options:
- Recommended Software (Default)
- Show All Software - Use the button that toggles between Show All and Show Recommended to switch the view.
- The Request status section will list any software that has been requested and its request status.
- The User Profile section appears whenever a user first accesses the Software Portal and all required fields must be entered before the Save changes button can be pressed. Once saved it moves to the Home page. See this screenshot for an example:
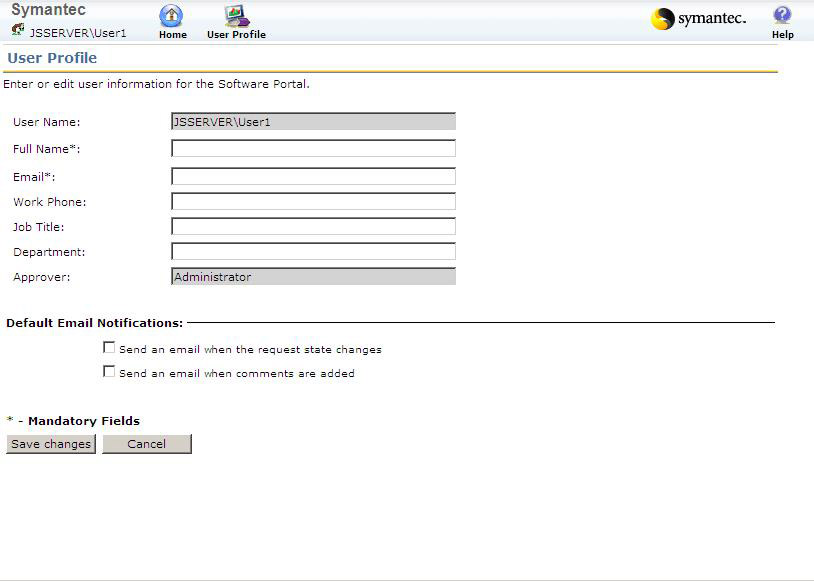
- If the logged on user is an Administrator, another option shows up next to Home and User Profile: Manage. This allows Administrators to service Software Portal Requests that they are in charge of addressing.
NOTE: This is the same as the Administrator Portal covered in the Configuring the Software Portal section.
Configuring the Software Portal
To use the Portal you need to have the Altiris Agent and the Software Portal Agent. You also need to have the Software Portal Settings correctly configured for you environment. Use the following two procedures to setup the Software Portal for general use.
Software Portal Agent
Unlike other Altiris Agent Plug-ins, the Software Portal install is configured outside of the Plug-in area. The options for where the Software Portal Links are seen on managed systems are selected at the time of the deployment of the Portal Agent. Follow these steps to configure the links and rollout the Software Portal Agent:
- In the Symantec Management Console, browse to Settings > All Settings > and browse down through Software > Software Portal Settings > and select Software Portal Agent Installation.
- Check the options under 'Configure Links' for where you want the Software Portal link to appear, from the choices:
- Show link for Software Portal on Desktop
- Show link for Software Portal in Start Menu
- Show link for Software Portal in Altiris Agent's context menu
- By default no Targets are selected. It is recommended to roll this out to all Managed systems. One intelligent method is detailed here:
- Under the Select Destination section, click Apply to and choose Computers.
- Click the Add rule button on the resulting window.
- Next the THEN:, choose exclude computers not in from the first dropdown.
- Select Filter from the second dropdown.
- Type 'All Windows Computers with Software' into the field, and click the dropdown.
- Select the option All Windows Computers with Software Management Solution Agent Installed'.
- In the window below you'll see the matching computers.
- Click OK and the selection will be saved.
- Apply a Schedule to roll this out. See this screenshot for an example:

- Click Save changes to finish
- Stop! The above is the official way to rollout the settings, but this is not the recommended way at this time. See the section on Agent Rollouts preceding this one for more details and to learn the recommended method.
Software Portal Settings
The Software Portal settings provide some important features. Control how many software objects can be requested at any one time, and customize the Software Portal UI. Access these in the Symantec Management Console, browse to Settings > All Settings > and browse down through Software > Software Portal Settings > and select Software Portal Settings.
Under Flow Settings you'll see the option: Maximum number of open requests per user: [3]. Three is the default, but this can be changed to meet the requirements of your environment.
Under the UI Settings section you are given the options to brand the Software Portal. Copy a company logo to the Notification Server, and then use the Browse button to select that icon. This will brand the Software Portal with your unique logo. You are also provided a field to type in the company name which will be prominently displayed in the Software Portal.
Administrator Portal
This allows Administrators to service Software Portal Request that require approval. When the interface is loaded, the user who accessed it will see outstanding requests listed. See this screenshot for an example:
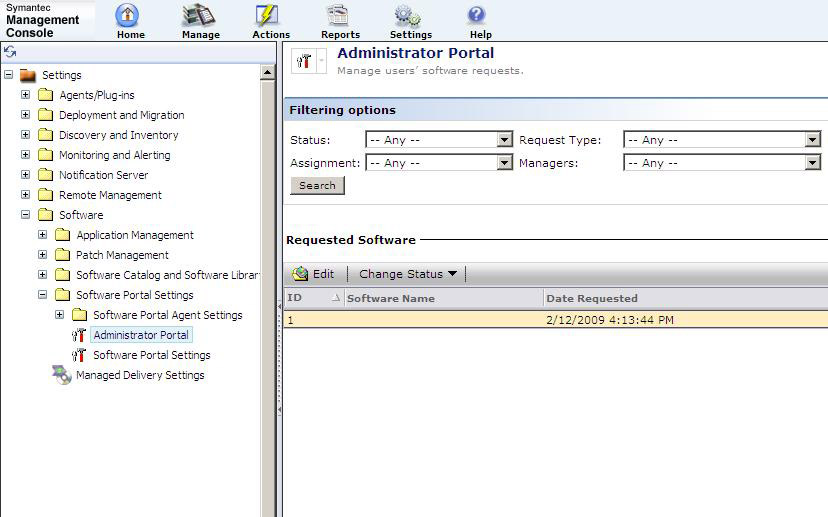
Recall that this same interface is available by having the same administrator access the Software Portal and click on the Manage tab. To service a request, follow these steps:
- In the Symantec Management Console browse under Settings > All Settings > Software > Software portal Settings, and select Administrator Portal.
- Use the filtering options if needed to change what is shown in the Portal.
- Under the Requested Software field select the request you wish to fulfill.
- Click Edit if you wish to add a comment or review the Request History, as shown in this screenshot:
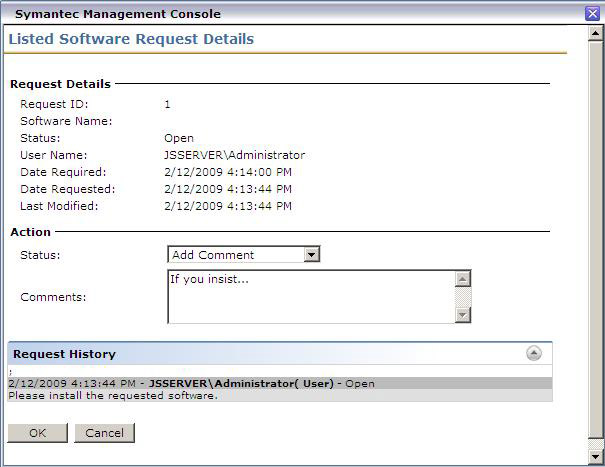
- Set a status by using the Edit function detailed above, or by selecting the request in the Portal grid and using the Change Status bar to set the status.
- A dialog will appear with the option to put in comments for the action selected. Click OK to initiate the given action.
This raises the question: How does a user request know what Administrator the request should be routed to? This is configured in the User Profile for an administrator. Unlike normal users, administrators have an additional section labeled Add Users: where administrators can add any users that report to them, as shown:

This isn't simply an employee-manager relationship, but specifically relates to what users need your approval for deployment Software.
Publishing to the Portal
The two basic object types that can be published to the portal are Software Components and Managed Deliveries. These two items are different and it's important to understand the difference between the two.
Software Components
Software components are one of three types of software management, namely:
- Software Release - A Software release normally represents the base or regular install for an application.
- Service Pack - A Service Pack typically provides major updates to a Software Release.
- Software Update - A Software Update is usually a single point-fix or feature correction for a Software Release.
The following information applies to all types of Software Components:
Software Components can contain multiple packages and command-lines. If a component has more than one command-line, one of the command-lines needs to be set as the default in order for this software component to be a valid request. See this screenshot for an illustration for this:
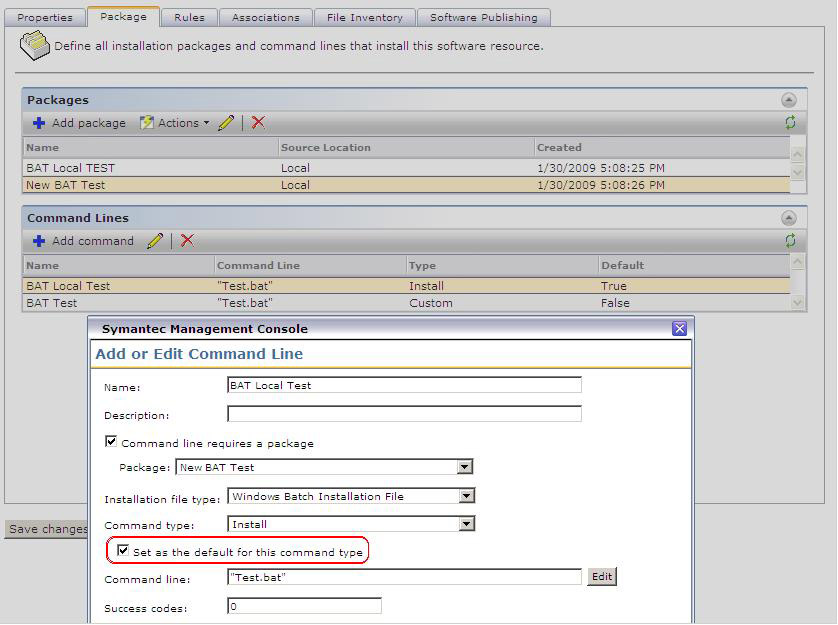
Most Command types in the Command Line configuration allows the option to be checked. However for migrated packages from 6.x promoted to Software components in 7.0 the default option is Custom. Administrators can also set this type for command-lines that don't explicitly meet the labels available as install or uninstall, etc. Custom does not allow publishing to the software portal unless the command line is the only one available in the Software Resource.
The message you receive if more than one command-line exists and none of them are default is: You cannot request this software now. Contact your administrator.
Rules only apply to Managed Software Delivery Policies so any Rules defined under the Rule tab of a Software Component, regardless of the type, is not used. If you wish to use the Rules, create a Managed Delivery Job that utilizes the Software Component.
Managed Software Deliveries
Unlike a Software Component, a Managed Delivery represents a set of rules for actively managing software. Rules configured in Software Component apply to software components selected to be part of the Managed Delivery Job. Managed Deliveries are like Sequential Tasks, only much more powerful and intelligent, whereas Sequential Tasks offered little or no intelligence when deployment Software.
Managed Tasks are access in the Symantec Management Console under Manage > Policies > Software > Managed Software Delivery. See this screenshot for an example:
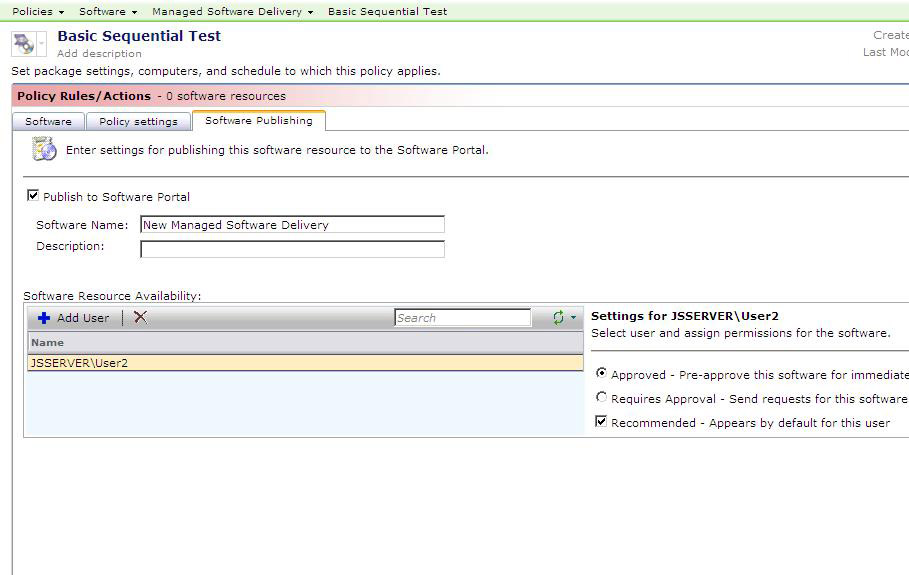
It is recommended to test a Managed Delivery before you publish it to the Software Portal. Because of the potential complexities involved, untested Managed Deliveries may show up correctly on the Portal but fail to function due to configuration issues.
Adding a single user or group to the Software Portal
The following process illustrates how to add a user or group to the Software Portal:
- In the Symantec Management Console browse in Manage > Software > Software Catalog > Deliverable Software.
- Select the Software Resource in question (whether a Software Release, Software Update, or Service Pack) and click the edit icon.
- In the resulting window, click on the Software Publishing tab.
- Check the option Publish to the Software Portal.
- It is recommended to update the Software Name field to something users will be able to understand. Also use the Description field to expound on what the software does. See this screenshot for an example:
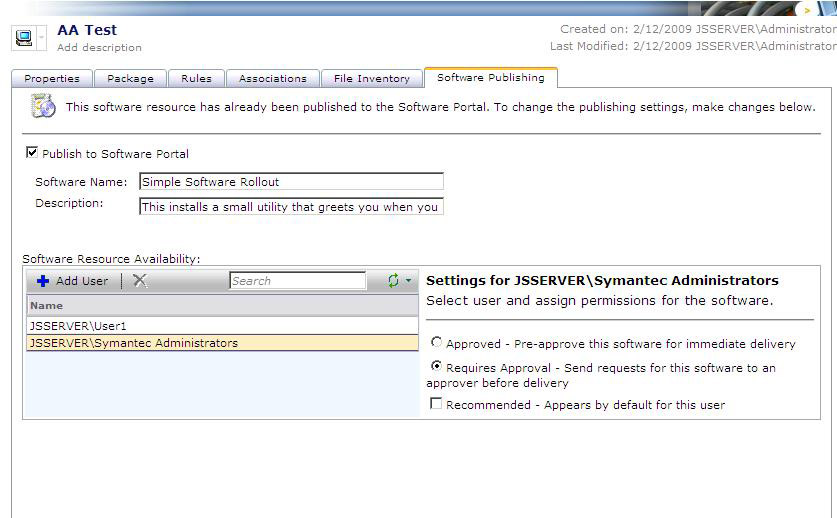
- Click the Add User icon.
- Enter search criteria. Note that this can be either groups or users.
- Click Search and select the desired user or group from the list.
- Click OK to save the selection.
- Highlight the new user or group and configure the settings to the right.
- Select Approved or Requires Approval.
- Check the Recommended option if you want this software to show up listed in the portal when the user or users in the group access the Portal.
NOTE: Overuse of this option will affect the load time of the Portal and render its usefulness ineffective.
- See more details under Scope Security.
- Click Save Changes to finish.
Managing Groups for Targeted Publishing
Configuring each End-user would be extremely time-consuming. Normally only specific individuals such as executive management or IT administrators may require specific entries. Otherwise local or domain-level security groups can be utilized to simplify the configuration of the Software Portal. When a user accesses the portal, all of that user's security contexts are passed to the NS for processing, including any groups they belong to. For proper maintenance, note the following:
- AD Organization required to be updated and current
- Correct assignments of auxiliary groups that may be granted access to Software
- Removal of users when switching organizations or leaving the company to remove access to company licensed software
By using the AD Groups listed on the left for assigning rights to the Software Components or Managed Deliveries, all individual users within that group will have the access granted to the group.
Software Publishing Security
When a user accesses the Software Portal, the system they are logged onto does not directly drive what software shows up in the portal. The exception is the Portal will filter based on basic OS type between Windows and Macintosh. Otherwise the physical system is not presented to the NS when the Portal is loaded. It's the user's Domain account that drives what software shows up on the portal, what software can be installed automatically, and what software requires approval.
Scope Security
When the portal loads, the user's SID is transmitted to the Notification Server. The NS will enumerate through all available Software Components and Managed Deliveries to see what objects the user has rights for, and what software is recommended for him or her. The two available options are shown to the side of the security dialog in this screenshot:
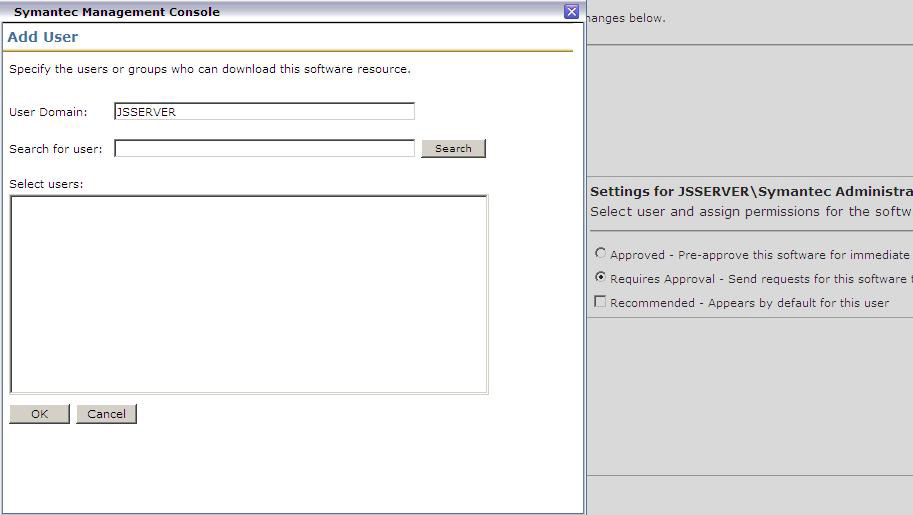
By selecting either Approved or Requires Approval a scope-based security item is created for that user with the selected permission. This fits into the natural Symantec Management Platform security. Things to note:
- Adding many single users can cause performance issues when security functions are called across the Notification Server as each user will require a security account within NS.
- Managing Groups instead of users will not only increase the effectiveness of administration, but lighten the load on any Security related function.
- An entry for Approved will override an entry for Requires Approval. Thus if a user is given specific rights to request software requiring approval, but that user also resides in a group that provides software already approved, the user will default to Approved when accessing the Software Portal.
Tracking Deployments
After you've setup your Quick or Managed Deliveries, now you need the ability to track the deployments. This can be accomplished in two basic ways: Task Server Status grids, and the Software Management Reports. Both methods provide insight into the degree of success for a quick deployment or a Managed deployment.
Task Server Statuses
The status grid and drilldowns provided by Task Server are not available for Managed Delivery. The main reason for this is that the Tasks executed during a Managed Delivery are not initiated from the server, but are client-initiated tasks. This leaves Quick Delivery as the consumer of this feature.
To demonstrate how this works, I'll use the test deployment of SQL 2008 previously configured. In this example I want to check to see how the Quick Delivery Task operated.
- In the Symantec Management Console, browse under Manage > Jobs and Tasks.
- Browse down through Jobs and Tasks > System Jobs and Tasks > Software > Quick Delivery.
- When you select your Task, in this example SQL 2008, you'll receive the following screen:
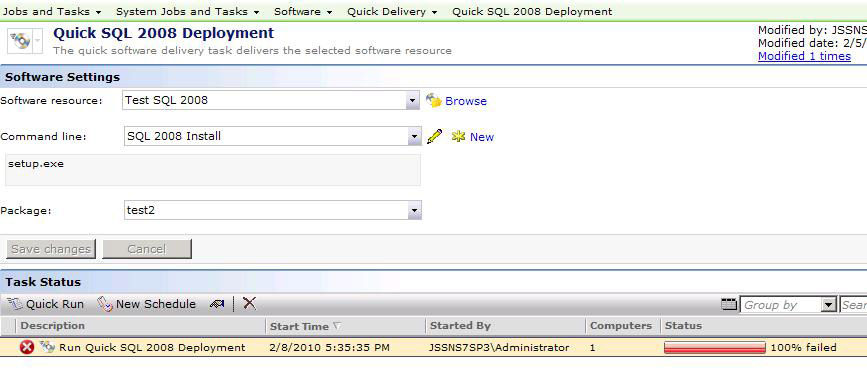
- As seen, this deployment failed.
- Double-click on the scheduled instances to drill down into this instance.
- This gives you a more in-depth view of statuses. If this rollout had multiple target computers, you'd have the ability to see status per resource. See this screenshot for an example:
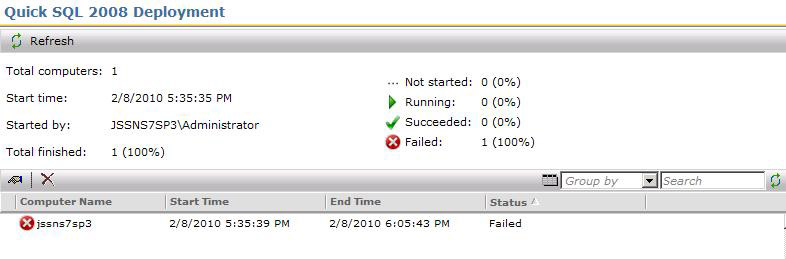
- To receive all status information for a particular execution attempt, drill down by double-clicking on the row desired.
- The following screenshot demonstrates this screen:
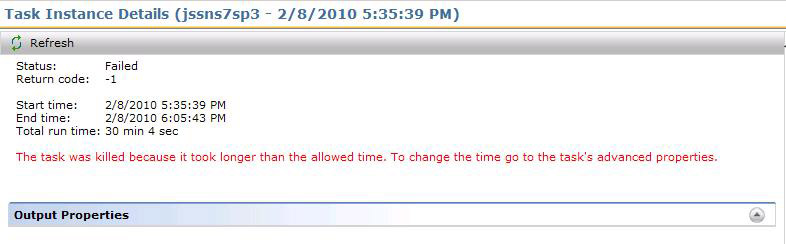
- As you can see, the Task was terminated based on the execution time exceeding the Task timeout value set under the Advanced Settings.
For tasks, this grid system allows you to view the status at multiple layers, with greater granularity the further you drill down.
Provided Reports
Reports offer flexibility in how you want to view the results of a managed or quick deployment. The following reports are available for use in tracking deployments.
For Task Server Quick Delivery reports, they are found in the Symantec Management Console under Reports > All Reports > Software > Delivery (some reports contained in the root) > and Status.
NOTE: These are for Quick Delivery Tasks only:
- Software Delivery - Download Status
- Software Delivery - Download Summary
- Software Delivery - Execution Attempts
- Software Delivery - Execution Failures
- Software Delivery - Execution Status
- Software Delivery - Execution Summary
- Status > Quick Delivery Details by Task
- Status > Quick Delivery Details by Computer
- Status > Software Delivery - Status (All Instances)
- Status > Software Delivery - Summary (All Executions)
Obviously some reports are better than others for giving you an idea how compliant your target systems are. For my example I will use the Software Delivery - Execution Status in tracking the previous SQL rollout.
- Load the report Status > Software Delivery - Status (All Instances).
- Change the date range to start at the date you initially configured and rolled out your task.
- If necessary, choose a specific Task to track. In my example I only had 2 and left the field as All.
- Click Refresh.
- See the following screenshot for the results:
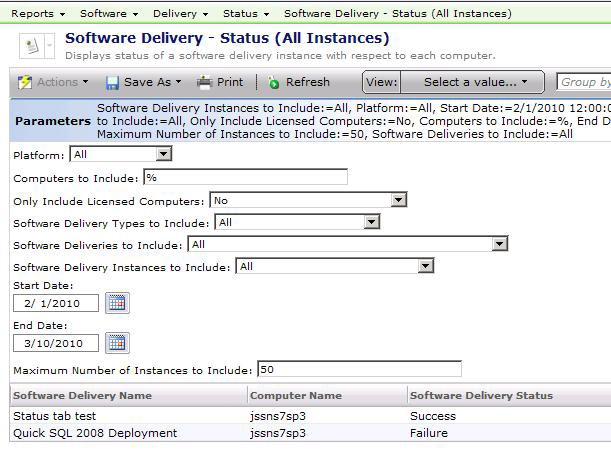
- Manipulate the parameters as needed to tune your results. Most of the reports listed above have the same parameters.
For Managed Software Delivery Policies, the Reports are found in the Symantec Management Console under Reports > All Reports > Software > Compliance. The following reports are available:
- Software Compliance by Computer
- Software Compliance by Managed Delivery Policy
- Software Compliance Detailed Summary
- Software Compliance Details by Computer
- Software Compliance Details by Managed Delivery Policy
- Software Compliance Remediation Summary
- Software Compliance Status
- Software Compliance Summary
These reports fit the nature of a Managed Delivery Policy. For example browse to the report: Software Compliance Summary. I've included all MSDs I've deployed in the example shown in the screenshot below:

Other reports provide more specific details for any given MSD. Review them all to find the one that gives you the best representation of the data you require.
Conclusion
I hope this best practices article helps ease you into the use of Software Management on the Symantec Management Platform 7.0. As new versions are released, some of this information may become out of date. Keep this in mind if you come across a screen you see or a step that doesn't fit. I don't anticipate large changes between now and even the 7.1 release.