Issue:
We have seen a variety of issues where data that is initially captured from an Inventory Policy is subsequently removed from the database. In most cases the first inventory capture works, but any subsequent ones send up blank data, stripping certain data from the affected machine. A good example is Processor data. The initial inventory captures the data and the system shows in any Processor-based reports, but when the next inventory runs, that data is removed from the database.
Applicable Versions: 7.1, 7.1 SP1, 7.1 SP2
Cause:
These issues are caused by a number of defects, currently being investigated by development (this statement posted on 8/15/2012 and may be superseded by a development fix in the form of a point-fix or upgrade that resolves the issues). The causes vary depending on which issue is seen. In most cases the Inventory Agent fails to load one of its supporting DLLs, such as InvApi.dll, or InvProvider.dll.
Resolution:
As stated previously, development is working to resolve this issue by fixing the defects in the code. Since the issue is not fixed, and the severity puts into question the accuracy of reports and the like, a work around has been found that will allow all inventory data affected by this to be captured successfully. This workaround uses the local InvSoln.exe utility to run inventory. This utility was added in 7.1 to give administrators the ability to run Inventory via command-line at the client side to aid in quick captures and troubleshooting. Interestingly, this method also does not have the issue plaguing the default Inventory Policies.
Workaround:
A customer working with Inventory inadvertently found a way to work around this issue. Using InvSoln.exe allows the data missing from the default policies to be properly captured. The following process creates Managed Delivery Policies to capture inventory, utilizing this client-side Inventory utility. Please note that the full process should be followed to ensure the default policies do not interfere and remove the data again.
Preparation
The following steps create a "dummy" package to be used as an anchor for the delivery policy.
- Create a directory on the NS with only a simple txt file therein (this will be a dummy package used to utilize the Managed Delivery Policies).
- In the Symantec Management Console, browse under Manage > Software.
- Right-click in the Installed Software box in the upper left and select Manage Software Catalog.
IMPORTANT! Please note that it may seem relevant to deviate from these provided steps, however these were create understanding how the different pieces interact. The steps should be followed as listed, and the settings provide should be used as indicated.
64-bit Component
The following resource is created for Inventory Agents installed on 64-bit Windows operating systems.
- Click Add under Newly discovered / undefined software and choose Software Release.
- Provide a Name, such as InvSoln.exe Full Inventory.
- Under version, provide 1.0 (this can be incremented as changes are made, if so desired).
- In the Company field, type Symantec and choose Symantec from the dropdown.

- Click on the Package tab.
- Click Add Package.
- Provide a name, such as InvSoln Inventory Package, no content.
- Change the Package Source to Access package from a directory on the Notification Server.
- Type in the path to the folder previously created, or use the Browse feature to browse to it.
- Click Display Location, and you should see the name of the text file found within the folder.

- Click on the Package Server tab.
- Under the Assign package to: dropdown, select All Package Servers.
- Click OK to save the Package.
- Click Add Command.
- Provide a name, such as InvSoln Full Inventory Execution.
- Uncheck the requirement "Command line requires a package".
- Set Installation file type to <other>.
- Provide the following command line:
"C:\Program Files (x86)\Altiris\Altiris Agent\Agents\Inventory Agent\InvSoln.exe" /fi
- Repeat the steps for each default Inventory Policy to run, such as:
"C:\Program Files (x86)\Altiris\Altiris Agent\Agents\Inventory Agent\InvSoln.exe" /dhi
"C:\Program Files (x86)\Altiris\Altiris Agent\Agents\Inventory Agent\InvSoln.exe" /dswi
These cover Full Inventory, Delta Hardware Inventory, and Delta Software Inventory.
- If you wish to use a custom policy, the command-line must be customized. The following is an example of what it would look like:
"C:\Program Files (x86)\Altiris\Altiris Agent\Agents\Inventory Agent\InvSoln.exe" /i "C:\Program Files (x86)\Altiris\Altiris Agent\Agents\Inventory Agent\InvTaskConfig\Name of Custom Policy.xml"
- Click on the Rules tab.
- Click *New next to the Applicability Rule dropdown.
- Provide a name, such as InvSoln 64-bit Applicability.
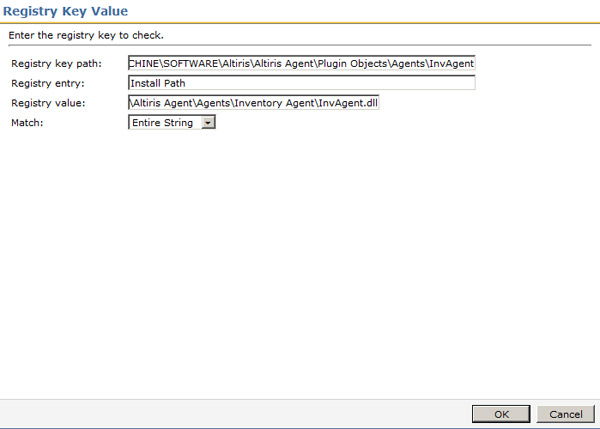
- Click the blue + button and choose Registry Key Value.
- Set the Registry key path: HKEY_LOCAL_MACHINE\SOFTWARE\Altiris\Altiris Agent\Plugin Objects\Agents\InvAgent
- Set the Registry entry: Install Path
- Set the Registry value: C:\Program Files (x86)\Altiris\Altiris Agent\Agents\Inventory Agent\InvAgent.dll
NOTE: If a custom install path was chosen, this value may be different.
- Click OK and OK again to save the Applicability Rule.
- Click OK to save all changes to the new Software Component.
32-bit Component
The following resource is for Inventory Agents installed on 32-bit Windows operating systems.
- Click Add under Newly discovered / undefined software and choose Software Release.
- Provide a Name, such as InvSoln.exe x86 Full Inventory.
- Under version, provide 1.0 (this can be incremented as changes are made, if so desired).
- In the Company field, type Symantec and choose Symantec from the dropdown.
- Click on the Package tab.
- Click Add Package.
- Provide a name, such as InvSoln x86 Inventory Package, no content.
- Change the Package Source to Access package from a directory on the Notification Server.
- Type in the path to the folder previously created, or use the Browse feature to browse to it.
- Click Display Location, and you should see the name of the text file found within the folder.
- Click on the Package Server tab.
- Under the Assign package to: dropdown, select All Package Servers.
- Click OK to save the Package.
- Click Add Command.
- Provide a name, such as InvSoln x86 Full Inventory Execution.
- Uncheck the requirement "Command line requires a package".
- Set Installation file type to <other>.
- Provide the following command line:
"C:\Program Files\Altiris\Altiris Agent\Agents\Inventory Agent\InvSoln.exe" /fi
- Repeat the steps for each default Inventory Policy to run, such as:
"C:\Program Files\Altiris\Altiris Agent\Agents\Inventory Agent\InvSoln.exe" /dhi
"C:\Program Files\Altiris\Altiris Agent\Agents\Inventory Agent\InvSoln.exe" /dswi
These cover Full Inventory, Delta Hardware Inventory, and Delta Software Inventory.
- If you wish to use a custom policy, the command-line must be customized. The following is an example of what it would look like:
"C:\Program Files\Altiris\Altiris Agent\Agents\Inventory Agent\InvSoln.exe" /i "C:\Program Files\Altiris\Altiris Agent\Agents\Inventory Agent\InvTaskConfig\Name of Custom Policy.xml"
- Click on the Rules tab.
- Click *New next to the Applicability Rule dropdown.
- Provide a name, such as InvSoln non-64-bit Applicability.
- Click the blue + button and choose Registry Key Value.
- Set the Registry key path: HKEY_LOCAL_MACHINE\SOFTWARE\Altiris\Altiris Agent\Plugin Objects\Agents\InvAgent
- Set the Registry entry: Install Path
- Set the Registry value: C:\Program Files\Altiris\Altiris Agent\Agents\Inventory Agent\InvAgent.dll
NOTE: If a custom install path was chosen, this value may be different.
- Click OK and OK again to save the Applicability Rule.
- Click OK to save all changes to the new Software Component.
Managed Delivery Policy
The following steps create a Managed Policy that will properly detect which execution needs to be run so that the proper paths are used based on the platform type.
- In the Symantec Management Console browse under Manage > Policies.
- Browse under Software > right-click on Managed Software Delivery > and choose New > Managed Software Delivery.
- Provide a name, such as: InvSoln Full Inventory Work-around Policy.
- Under the Policy Rules/Actions, click +Add > Software.
- Use the upper-right search and look for InvSoln.
- Locate the 64-bit package created, such as: InvSoln.exe Full Inventory and click OK.
- Under the Policy Rules/Actions, click +Add > Software.
- Use the upper-right search and look for InvSoln.
- Locate the 32-bit package created, such as: InvSoln.exe x86 Full Inventory and click OK.
- Click to highlight the first Software Component in the list.
- Under the Remediation settings section, click the dropdown and choose the command line, such as: InvSoln.exe Full inventory Execution.
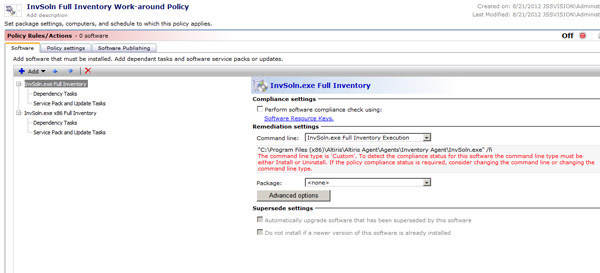
NOTE: Ignore the warning displayed.
- Click the Advanced button.
- Click the Run tab, and change the Display window: to Hidden.
- Click on the Results-based actions and change "Upon Failure" to Continue.
NOTE: This is vital to ensure any system attempts both Applicability checks, to ensure they run their proper platform type inventory, whether 32 or 64-bit.
- Click OK to save the changes to the Advanced Settings.
- Click to highlight the second Software Component in the list.
- Under the Remediation settings section, click the dropdown and choose the command line, such as: InvSoln x86 Full inventory Execution.
NOTE: Ignore the warning displayed.
- Click the Advanced button.
- Click the Run tab, and change the Display window: to Hidden.
- Click on the Results-based actions and change "Upon Failure" to Continue.
NOTE: This is vital to ensure any system attempts both Applicability checks, to ensure they run their proper platform type inventory, whether 32 or 64-bit.
- Click OK to save the changes to the Advanced Settings.
- To Save current progress, click the Save changes button.
- Expand the Applied to section using the right arrow button.
- Click Apply to > and choose Computers.
- Click Add rule under the Filtering Rules section.
- Use the following settings: THEN: exclude computers not in - Filter - Search for "Windows Computers with Inventory Plug-in.
- Click Update results to ensure the target is returning the expected number of systems.
- Click OK to save the target parameters.
- Expand the Schedule section using the right arrow button.
- Though no Compliance check will occur, a schedule must be set in the Compliance section. In this case you should set a schedule that fits your infrastructure's needs, such as: Start 18:00 Repeat weekly on Mon.
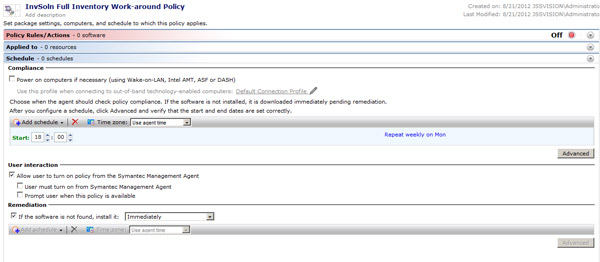
- If you wish to have Inventory run immediately the first time, also create a Schedule Time and set it to some time in the past, such as: 01:00, no Repeat (Start date under Advanced is either the same day or a previous date).
- Leave Remediation to occur immediately.
- Turn the Policy on, and then click Save changes to put the policy into effect.
Repeat the Policy process to include other Inventory types, such as Delta, Hardware only, custom, etc. The only difference in configuration is what command-line you choose within the Policy, and the name of the policy should be unique and easily recognizable.
Conclusion
While this process is not perfect, and this is only meant to work around this serious inventory issue, it should give you Inventory information, allowing you to capture inventory successfully until a permanent code fix can be provided.