Original article is posted here.
SQL integration of some sort has been involved in almost every project I’ve done. Saving and fetching data is just part of it; the SQL engine can be used to quickly do calculations and filtering for your data with the right scripting. If I’m able to fetch and filter the appropriate data from SQL to begin with, I don’t have to then run through a Configurable Collection Filter to get the results I want.
Again with the disclaimer: I’m not a SQL developer; everything I’ve learned has been while in the trenches with Altiris, Workflow, and anything else with which I’ve integrated Workflow over the years.
Now that that’s out of the way, on to the fun part. Let’s build a simple SQL query to pull some data from ProcessManager.
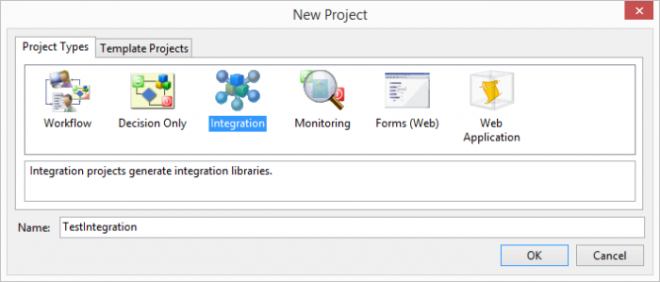
In the Workflow Manager, create a new project.
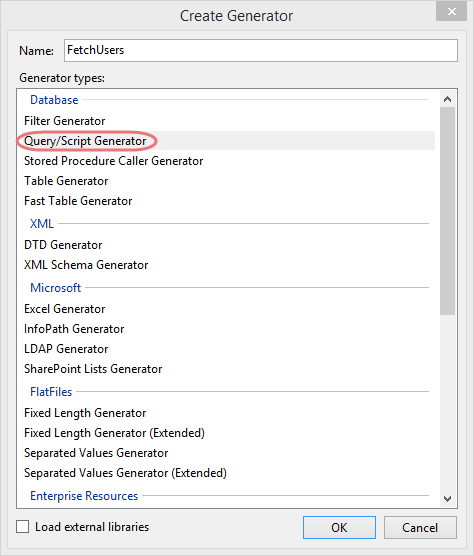
Give it a name and select Query/Script Generator.
Select the “SQL Server provider” and give it a connection string. The connection string here is used to validate authentication as well as build the table schema for the data type this component will create. We’ll come back to that in a moment. Test the string and ensure it returns ok.

There are connection string templates in the dropdown to help form a good string.
Now in the “SQL query” field, the script can be almost any valid SQL script.
select * from [User]
The script above would return all records from the User table and build a data type to match the returned table schema. However, let’s make this a bit better and issue-proof:
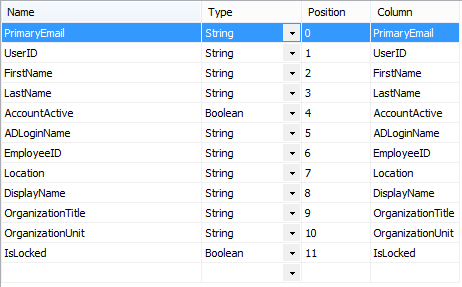
select [PrimaryEmail]
 ,[UserID]
 ,[FirstName]
 ,[LastName]
 ,[AccountActive]
 ,[ADLoginName]
 ,[EmployeeID]
 ,[Location]
 ,[DisplayName]
 ,[OrganizationTitle]
 ,[OrganizationUnit]
 ,[IsLocked]
from [User]
order by [DisplayName]
Consider this: what if, in a future version of Workflow, a column is added to the User table? Suddenly your integration library that was built with a “select *” no longer works and is throwing column count errors. This is a good example because that exact thing happened to me a while back. The drawback of specifying columns is that if you ever decide you need a column that you aren’t currently fetching, you’ll have to make the adjustment to your integration library, recompile, and reload the project, connecting any missing dots and lines afterwards.
More on SQL usability here.
What we have at this point would do a fine job pulling in all users from the User table, but let’s change the script just a bit more to allow for input from the Workflow data stream. Add a condition to your query just below the table name.
where [PrimaryEmail] = @primaryemail
When you click “Find Query Parameters”, anything marked with a @ (this marker is different when using different providers like Oracle) will create a parameter in the panel at the bottom.

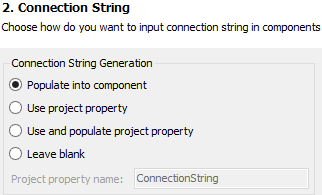
Leave the defaults for the purposes of this walkthrough. For the next step, my best practice recommendation is to “Leave Blank” and use a project or profile property in your Workflow project; but again, for this walkthrough, let’s just “Populate into component”.
The “Property Name” simply dictates what the name of the property in the generated component will be. Keep the default and carry on.

When fetching table schema for data type construction, normally the parameters can be left blank. There are some exceptions to this.
Check the “Returns data” box and then, once the parameters box pops up, click OK. If all is well, the schema should populate in the lower panel.
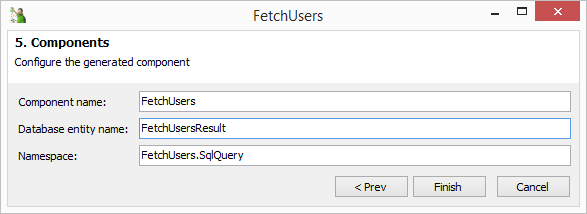
Leave everything as it is and click Next. Give the component a name, then press Tab and the db entity and namespace fields will auto-populate. Click Finish.
Click OK on the Generators Management window, and then click “Compile and close” (if you’re editing an existing library, this button will read “Recompile and close”).
In the “Help Editor”, you can do things like categorize and set icons to your components, provide description and other help text, and remove extra components in the wrong place in the category tree. Just click the X at the top right and then Yes to save the file before closing it.
Back in our Workflow project, select “Import Components” (just underneath the Toolbox), and find the library we just created.
Be sure to click Add once you’ve selected the library, then OK.

Afterwards, the new library should be available in the Toolbox.
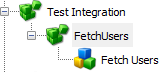
Pull the Fetch Users component out onto the Workflow canvas.

When we pass in the primaryemail value, the SQL engine will return any matches as the result array “FetchUsersResult”, or whatever that variable may be renamed to. Notice the Connection String was passed in because we elected to populate the component.
This component is now good to use for testing.