This article will cover the basic procedure for installing and configuring IT Analytics 7.1 with the Data Loss Prevention reporting content pack. This process assumes that you already have the Symantec Management Platform installed, and that server already meets the requirements for IT Analytics 7.1. For the complete list of software prerequisites for IT Analytics please refer to article HOWTO62383 on the Symantec Knowledge Base.
IT Analytics 7.1 and the various reporting content packs are available for install via the Symantec Installation Manager. These installation files can be downloaded directly to your server or you can create offline installation packages.
Installing IT Analytics and Content Packs
- Launch the Symantec Installation Manager.
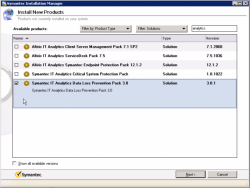
- Click Install New Products.
- Change the filter from Suites to Solutions.
- Scroll down the list, and check Altiris IT Analytics 7.1 SP2 and the Symantec IT Analytics Data Loss Prevention Pack 3.0.
- Click Next and select additional components to install (including documentation).
- Accept the end user license agreement and click Next and enter your contact information.
- Allow the Install Readiness Check to complete and install necessary prerequisites if needed.

- Review the installation details and click Begin install.
Configuring IT Analytics
Once IT Analytics has been installed, there are a few settings that will need to be configured to ensure a successful implementation.
- In the Symantec Management Console, on the Settings menu, click Notification Server > IT Analytics Settings.
- In the left pane, click Configuration.
- In the right pane, under Analysis Server, enter the host name of the Microsoft SQL Server Analysis Services. If you did not install SQL Server as the default instance, specify the following format: servername\instancename. Symantec recommends that you type the host name of the server on which Analysis Services reside. Using localhost as a host name restricts the access from the Symantec Management Console to the computer where Analysis Services resides. Note that this connection uses the Symantec Management Platform application ID credentials.

- Click Verify Connection, and confirm that the Analysis Server name has been verified and saved.
- Under Analysis Server Database, select an Analysis Server Database. For a new standard configuration, in the Create New Database box, accept the default to create a new Analysis Server Database with the IT Analytics name. If you select an existing database, note that the existing data sources are overwritten with the current Symantec Management Platform database settings.

- Click Save Database Settings.
- Under Reporting Server, in the Reporting Server Virtual Directory URL box, type the full URL of the Reporting Services ReportServer virtual directory. If you did not install SQL Server as the default instance, specify the virtual directory in the following format:
http://servername/ReportServer_InstanceName/

- Symantec recommends that you type the host name of the server on which Reporting Services reside. Using localhost as a host name restricts the access from the Symantec Management Console to the computer where Reporting Services resides.
- Click Verify Connection and confirm that the Reporting Server name has been verified and saved.
- In the Create new report folder text box, accept the default to create a new IT Analytics Report Folder. If you select an existing folder, existing data sources are overwritten with the current Analysis Server Database settings.

- Under Authentication Type, click one of the following options for accessing Reporting Services:
- Stored Credentials - This explicitly defines the user credentials. It also automatically manages authentication across all application tiers because access to Reporting Services is always authenticated with the same rights for all users. However, Stored Credentials limits the granular control that you have over the information within the reports to which users have access.
- Windows Integrated Authentication – This option allows the user's Windows credentials pass through to the Reporting Server. This method is recommended for restricting access to Reporting Services on a per-user basis. Windows Integrated Authentication allows a more granular control over the information in the reports to which you grant users access. However, additional configuration might be necessary to ensure that authentication is appropriately managed across all application tiers.

- Click Save Security Settings and confirm that the Report Folder name is verified and saved.

Installing the Oracle Database 11g Release 2 Client (11.2.0.1.0) for Microsoft Windows (x64)
Before a connection to the DLP database can be made from IT Analytics, the Oracle Client must be installed on the SQL server that hosts the Symantec Management Platform. To install the Oracle Database 11g Release 2 Client (11.2.0.1.0) for Microsoft Windows (x64):
- Ensure that any pre-existing oracle clients are removed from the server.
- Download the latest Oracle Database 11g Release 2 Client (11.2.0.1.0) for Microsoft Windows (x64) by navigating to the following URL: http://www.oracle.com/technetwork/database/enterprise-edition/downloads/112010-win64soft-094461.html
- Once the file has completed the download, navigate to the location where you saved the file and run the file called setup.exe.
- Click Next on the Welcome page.
- On the Select Installation Type page, select Custom, and then click Next.
- Accept the default Selected language (English) and click Next.
- On the Install Location page, enter the Oracle base name as well as the name of the instance and path, and then click Next.
- Verify that all the prerequisites are installed, and then click Next.
- On the Available Product Components page, scroll down and select the Oracle Services for Microsoft Transaction Server option. Also verify that the Oracle Provider for OLE DB option is selected and click Next.
- On the Oracle Services for Microsoft Transaction Server page, accept the default port and click Next.
- Click Finish.
- When finished click the Exit button.
- Open Microsoft SQL Server Management Studio, and connect to the Database Engine that is hosting the Symantec_CMDB database.
- On the Microsoft SQL Server Management Studio page, expand the tree to Database Server Name Server Objects -> Linked Servers.
- Expand the Providers folder.
- Right click OraOLEDB.Oracle provider, and then select Properties.
- Click Allow in process option, and then click OK.
- Restart the SQL Server box.
OPTIONAL - To improve the performance of the OLE DB driver, perform the following additional recommended steps:
- Open the registry. To open the registry, on the command prompt, type “regedit”.
- Navigate to the following key: HKEY_LOCAL_MACHINE_SOFTWARE_ORACLE\%ORACLE_CLIENT_INSTANCE%\OLEDB
- Modify the following string values:
ChunkSize – recommended value: 200
FetchSize – recommended value: 500
- Restart the server.
Configuring the Data Loss Prevention Connections
Configure these connections before you install the IT Analytics Data Loss Prevention cubes.
To configure Data Loss Prevention connections:
- In the Symantec Management Console, on the Settings menu, click Notification Server > IT Analytics Settings.
- In the left pane, expand the Connections folder.
- Click Symantec Data Loss Prevention.
- In the right pane, enter the information for each of the connection fields.

- Click Apply.
Note: Depending on how you have the TNS listener in DLP configured, you may have to specify either the fully qualified domain name or the service name in the EZConnect connection string.
For example, your valid connection string could look like:
DLPSERVER1:1521/protect
or
DLPSERVER1:1521/protect.subdomain.domain*
* Replace with the fully qualified domain name of the service
Adding Additional Data Loss Prevention Connections (Optional)
IT Analytics Server lets you add additional Data Loss Prevention connections so their relevant data can be leveraged for reporting purposes. This provides a global reporting view across multiple DLP databases without the need to replicate large amounts of data.
To add additional Data Loss Prevention connections:
- In the Symantec Management Console, on the Settings menu, click Notification Server > IT Analytics Settings.
- In the left pane, expand the Connections folders.
- Click Symantec Data Loss Prevention.

- In the right pane, click New, and enter the information for each of the connection fields. Note that the New option is not displayed if you do not have at least one Data Loss Prevention connection saved.
- Click Apply.
Adding Cubes and Reports
Before IT Analytics cubes and reports can be viewed in the Symantec Management Console, they must first be installed from the content pack. You may choose to install all available cubes and reports or just some individually.
Installing Cubes
- In the Symantec Management Console, on the Settings menu, click Notification Server > IT Analytics Settings.
- In the left pane, expand the Cubes folders.

- In the Cubes page, click the Available tab.
- Check all the cubes that you want to install. To install all of the available cubes, in the header row of the table, click Install.
- Click Save Changes.
- At the prompt, click OK to proceed with the installation.
- IT Analytics Event Viewer window displays the progress of each cube that was selected. Click Close when the process has completed.

- Verify that the cubes were successfully created by clicking the Installed tab, and then review the list of cubes.
Installing Reports
- In the left pane, expand the Reports folders.

- In the Report Setup window, click the Available tab.
- Check all the reports that you want to install. To install all of the available reports, in the header row of the table, click Install.
- Click Save Changes.
- At the prompt, click OK to proceed with the installation.
- IT Analytics Event Viewer window displays the progress of each report that was selected. Click Close when the process has completed.
- Verify that the reports were successfully installed by clicking the Installed tab, and then review the list of reports.
Configuring the Cube Processing Tasks
This task is essential for the solution to function properly because the cubes do not contain any data until the cube processing is complete.
You can create and assign processing schedules for all installed cubes. Your business needs to dictate how often the cubes should be processed. For a typical configuration, all cubes should be processed daily.
Multiple processing tasks can be used for more granular control of cube processing. More than one cube can share a dimension. In this case, the last processed date of all cubes that use that dimension updates to the last processed date of the shared dimensions. However, the actual data in the cubes is not processed until a processing task is run that is configured to process that specific cube.
To configure the cube processing tasks:
- In the Symantec Management Console, on the Settings menu, click Notification Server > IT Analytics Settings.
- In the left pane, expand the Processing folders.

- Select the schedule that you want for the default processing tasks, and then check the Enabled box. Symantec recommends processing cubes no more than once a day, depending on the number of cubes and amount of data in your environment.
- Check the box for each available cube that you want to be processed on the current schedule. For a typical configuration, select all cubes.
- Click Save Changes and confirm that the Default Processing Task is saved.

- Click Run Now. The selected processing tasks start asynchronously, which means that the task does not finish by the time that the page refreshes. This task can take several minutes to execute. The execution time depends on the number of the cubes that are selected and the size of data within the database. You can monitor its progress by viewing the events in the IT Analytics Event Viewer window while the manual processing task executes.

Verifying Your Installation
You can verify your installation and ensure that all of your configuration steps complete successfully.
To verify your installation:
- In the Symantec Management Console, on the Reports menu, click All Reports.
- In the left pane, under IT Analytics, the following items should appear: If you experience pop-up dialog boxes while your cubes load, you need to remove the warning messages. See "Troubleshooting Browser Issues in IT Analytics 7.1" for more information.
